barnum42
New Member
Reeeespecc' to the Magic Massiv' :lol:kevlightyear said:Good point--it is massive.
Reeeespecc' to the Magic Massiv' :lol:kevlightyear said:Good point--it is massive.
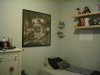
nicholas said:Ok. I finally finished mine. It's been mounted, framed, and now...displayed! Here's what it ended up looking like. (with the black matting I gave it, it came to 40x40)
djmatthews said:This is a great site.... shame that all of WDW is not available.
mrtoad said:Did you take is somewhere or mount it yourself? If yourself, can you tell us what you did?
")
nicholas said:I did it myself. Was too afraid to even find out how much it would cost to have it professionally done.
Here's the process I took, though I'm sure there are better ones, but I'm more than pleased with how mine turned out.
1) print images
2) used a nice paper cutter to cut them out
3) purchased foam mounting board. the image size is 37.5 x 37.5 when assembled (for MK) and the only size mounting board I could find that was big enough was 40x60, so I opted to cut it to 40x40 and have a nice border around the actual image. I also opted for black foam board instead of white because any small gaps or misalignments would show the white much more than the black and be more obvious.
4) assemled the images by taping them together (from behind so no tape actually showed. (another idea I had was to use spray adhesive on the back of each piece and mount that directly onto the board, thus assembling them there. but that just seemed to risky and permanent if I were to get something slightly off)
5) put the completed image onto the foam board (again, i used loops of tape about every inch around the perimeter)
6) ordered the frame and plexiglass. (a good and fairly cheap place to get frames is either americanframes.com or framesbymail.com, but framesbymail is the only one of the two that can handle shipping a piece of plexi that large)
7) wait patiently for frame and plexi to arrive in the mail
8) assemble frame (easy as pie) and insert art
9)hang on wall
10) ENJOY YOUR NEW WORK OF ART!
Anyway, that's how I did it. Not the only way to do it, but it worked for me. If you do one, especially if you do one of the other parks coffeejedi has made for us, please show your pictures!!!
nicholas said:Ok. I finally finished mine. It's been mounted, framed, and now...displayed! Here's what it ended up looking like. (with the black matting I gave it, it came to 40x40)
a foam mounting board. I just went into an art/craft store and they had a custom framing section in it and I went over to them and said "I need a mounting board" and they showed me what to get.DarkImage4 said:Nicholas,
What did you mount the seperate print outs on?
Register on WDWMAGIC. This sidebar will go away, and you'll see fewer ads.