Stretching Room scale model (Updated: 5/10/18)

NoiseAndSignal

Active Member
Original Poster
Hello all,


You may remember last year I shared my Hatbox Ghost Halloween costume.

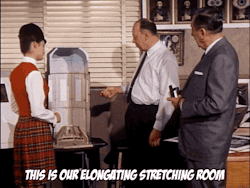
I'm now building a functioning 1/12 scale model of a Stretching Room in Disneyland's Haunted Mansion, and in this thread I'll document my progress on it.

This is my CAD model of how it will be constructed, with a human for scale. (The portraits themselves aren't displayed here, though their stretching mechanics are.) In the model, one wall of the room will be omitted for viewing. The upper plane on the right side is where the foyer would be, and the lower plane in the back is where the portrait hall would begin. (I might also model those scenes if I have time later, but that's quite far off from now.)

pic1.png

pic2.png


The model will, of course, stretch as the real thing does, and will also include all of the lighting and sound. It will also play the foyer spiel and the doors will open and close. The entire setup will stand approximately seven feet tall.

I'm interested in the stretching room because, at first glance, the effect seems simple: it's an elevator that descends, and the portraits unroll. But the more you think about it, the more apparent it becomes that the mechanics of the effect are very *very* complicated, and I will explore those details through the construction of this model.

I started by building the ceiling cornice and the attic, made from basswood. I wanted to be sure that all of the moulding was built as accurate as possible. I cut and assembled every piece of moulding by hand.
pic3.JPG

pic4.JPG


And then the attic structure--the inner piece shown below--and the outer shell for the black sky backdrop behind the windows. I'm using MDF to make all the wall pieces, since it cuts pretty smoothly for all that octagonal geometry.

pic5.JPG


In the real-life attic, the wood texture on the wall is just painted on. For the model, I recreated the textures of the attic and then printed them to size. I made the window muntins out of basswood (for the straight parts) and styrene (for the bent parts). The hole is where the hanging man will be attached later.

pic6.JPG


Here's the finished ceiling cornice, with the attic and hanging man attached. The miniature skeleton is a Halloween decoration, and I made the clothes for him from scratch. Notice that on the cornice, the middle section of moulding is missing on one side (toward the top of the photo). This is on the viewing side on the model, thus that section cannot be seen by the viewer. I left it open in case I want to put some extra lighting in there, since the show lighting may not scale down proportionally.

pic7.JPG


Up next: the ceiling scrim and the wallpaper section
 

kap91

Well-Known Member
Seriously?!?! This is just stupid levels of amazing.

What the hell is your day job and can I learn all your skills?
 

Old Mouseketeer

Well-Known Member
Truly amazing! I tend to think more in 2D, so I'm more familiar with the floor plan of the ride. You have exposed aspects of the mechanics that I hadn't really thought through. Thanks so much!

And congratulations--you win the award for best new thing I have discovered on the Interwebs at 5:00 am in a very long time!!!
 
Last edited:

180º

Well-Known Member
Okay, first you show us this detailed 3D model, then you show us dozens of beautiful in-progress construction shots. I’m already blown away and it’s not even finished yet...?

We’re not worthy!
 

Old Mouseketeer

Well-Known Member
It's like the model they had on display when Walt Disney didn't know the name of The Haunted Mansion and was convinced there was an attraction called The House of Illusions.

tumblr_n21sxy0Kr21s2wio8o1_250.gif


I've wondered if the old man actually experienced the rooms before he died since they were installed with the house.

I'm not sure that's correct. I thought the House and the basement up to the RR track were an empty steel framework shell. I'm not clear that any of the mechanism for the expanding rooms was in place, much less the finishes and effects.
 

NoiseAndSignal

Active Member
Original Poster
Firstly, thanks for all the kind words. To answer some of your comments:

So is this project for personal enjoyment or for some contest or public art gallery?

Just personal enjoyment--the stretching room is one of my favorite show scenes from a compositional standpoint, and the more I thought about the mechanics that make it work, the more I became interested in how complex it actually is.

I'm not sure that's correct. I thought the House and the basement up to the RR track were an empty steel framework shell. I'm not clear that any of the mechanism for the expanding rooms was in place, much less the finishes and effects.

I'm not sure of the exact timeline there, but there are definitely some things about the stretching rooms that had to have been built with the facade, such as the elevator pits and the 20' elevator piston embedded underground. The Long-Forgotten Blog also cites blueprints from 1962 that show the stretching rooms as part of the construction: https://longforgottenhauntedmansion.blogspot.com/2011/07/weirder-haunted-mansion.html At the very least, I think a functional version of the rooms were there when the facade was built, even if the decoration was not done yet.

--

Ceiling Scrim & Wallpaper Section

Next is the ceiling scrim. More specifically, 3 attempts at making the scrim before I was happy with the result. The issues with the first two attempts were: (1) I made the scrim out of nylon stocking material, which tore over time because it was held in place using staples, and (2) using a broad-tip oil marker to draw the ceiling pattern caused too much ink bleeding at the corners of the pattern.

The solution that worked was using a more tightly-woven polyester material (that was still see-through enough for the effect, but strong enough that the staples would hold it in place rather than tear it), and using several strokes with a fine-point oil marker to draw the pattern. I am very happy with the result.

pic8.jpg


And now onto the wallpaper section. To get the clearest possible reference of the wallpaper pattern, I found a photo of a piece of the wallpaper was up for auction. I replicated the pattern from the reference photo and tiled it to fit the dimensions of the wall. (These printed sheets are 13"x19".)

pic9.jpg


Here's the wallpaper section coming together, and then applying the wallpaper:

pic10.jpg

pic11.jpg


As for the holes cut in the walls: the slit toward the bottom is where the bottom piece of framing will be attached, where the painting will emerge as it stretches. And then the larger hole represents the 'limits' that the portraits can stretch. So when the portraits are at their smallest size, the top piece of framing is at the bottom of this hole:
pic12.png


And when the portraits are at their tallest size, the top piece of framing has moved to the top of this hole:

pic13.png


In practice, this hole is covered by an additional layer of wallpaper that is attached to the top of the portrait frame.

The rollers on the top and bottom of these walls, visible in the previous photos, are for the portrait mechanics. I believe the portrait unrolling mechanism that I'm using is actually different from how it works in real life, though the onstage visual will be identical. (The real-life mechanism is harder to achieve on a small scale)

Up next: the gargoyle shelf
 

NoiseAndSignal

Active Member
Original Poster
Making the gargoyles was, all things considered, a very lucky experience for me--that is, a lot of experimental things that happened to work surprisingly well.

I started by sculpting a digital model of the gargoyle, which I would 3D-print to make the miniatures. I've done a fair amount of 3D modeling, but really only architectural stuff. Character sculpting--or really, modeling anything outside of rectangles and mathematically-describable curves--would be a brand new experience for me.

I sculpted the gargoyle in Blender, which I've never used before. Blender has a notoriously steep learning curve. As soon as I figured out how to close the 10 duplicate toolbars I accidentally created when I opened the window, I was able to learn what I needed for sculpting relatively easily.

Another challenge with sculpting the figure was, as surprising as it might seem, a lack of usable reference photos. Of course there are many photos of the gargoyles online, but because of the overhead position of them relative to the guests, there aren't really any head-on photos of them—they're all taken from below. (And ideally, when modeling something, I'd be able to have head-on or 'orthographic' references for top, front, and side--these were crucial when I made the digital model of the room itself, for instance.)

Here's how the model ended up:

pic14.png
pic15.png
pic16.png


So, honestly, my process for sculpting this was just kind of…winging it. Tabbing back and forth between some reference photos and just figuring out how to use the different sculpting brushes until it looked like it was right. (The entire sculpture started as just a sphere) I modeled it without the candles, as I will need to embed the LED lights in those, so they will be made separately.

My original plan was to send this model off to get the figures casted by a manufacturer. I have a 3D printer, but knowing its capabilities I wasn't sure if it would be able to achieve the level of detail that I wanted. (In the scale of this model, the gargoyles are about 2 inches from front to back, so the face details are quite small.) But just to see what would happen, I put the model in my printer, set to its highest detail level. And it turns out, it was able to pull it off pretty well--it needed a bit of sanding (as most consumer 3D prints do), but it seemed to get enough of the face details for my liking. (The details aren't quite visible in this photo due to the frosted plastic, but they'll come through later when painted.)

pic17.JPG


One gargoyle takes about 2 hours to print. Through the night, they multiplied.

pic18.JPG

pic19.JPG


(Since one wall is cut away on the room model, the model only has 6 gargoyles rather than the full 8.)

I spray painted them the charcoal color, and then gave a light coat with watered down turquoise paint for the patina.

pic20.JPG


Even at this point, the plan for the candles was somewhat unknown. As is visible in the previous photos, I left some 2mm-wide holes in their hands to affix whatever the candle would be made of.

Constructing the candles to light up, at that scale, poses two challenges:
1. finding and handling an LED that is sufficiently small to fit in the miniature candle (2mm across)
2. running the wires to that LED--two wires per LED, thus four wires per gargoyle, which have to be hidden on the body of this solid figure.

An early solution I tried was using fiber optic strands. That meant that instead of wiring an LED inside the candle itself, I would use a fiber optic strand, which is a thin, flexible plastic strand that allows light to travel from one end to the other. So I could have an LED of any size located behind the scenes, placed up against one end of the fiber optic strand, and the strand could run relatively invisibly beside the gargoyle to the candle and carry the light there. In theory this would solve both problems above: fiber optic strands can be very thin, perhaps 1/32nd of an inch, and are also clear, meaning easy fitting and no visible bundle of wires.

However, as I experimented with some of my spare 3,600 fiber optic strands from a previous project, I found that the strands weren't flexible enough to make the tiny bends needed to get behind the gargoyle's arms and into the candlestick.

So I figured I'd just try to do it with LEDs the best I could. 3mm is a standard size for LEDs (as opposed to the 2mm width that would be correct for scale), so those were easy to find, meaning the candles would have to be just a little bit thicker than planned at that scale. I soldered the 12 LEDs to some ultra thin 30AWG wire (the thinnest wire that could handle sufficient amperage to drive the LEDs)

pic21.JPG


Here's a picture that shows the candle's construction (left) and final coat (right)

pic22.JPG


The base for the candle is a 2mm styrene tube. The LED is glued so it sits atop it, and the wires run down the candlestick and are glued to hide behind the gargoyle's arm. The wires run down a crevice along the chest, and out the back. The candle base and wires are then coated in acrylic mousse, which is paint with a concrete-like consistency so it can be sculpted with a rough texture.

pic23.JPG


It'll be a little while until we get to see the candles all lit up, as there's still quite a lot of large scale stuff to get through before installing the gargoyles. (I did test them all, and they look so good I figured I'd save the visual for when we get to the installation part.)

Up next: the lower wooden part of the room
 

Register on WDWMAGIC. This sidebar will go away, and you'll see fewer ads.

Back
Top Bottom