Islands of Adventure has been getting long in the tooth since Epic Universe opened and made a splash. No one really goes to the park other than to catch the occasional ride on Hagrid. Team TMNT is on the job to fix that! Marvel Superhero Island and Toon Lagoon have been caught up in rights issues and have been replaced with new islands themed to Avatar: The Last Airbender and Dragon's Lair. Meanwhile, the long in the tooth Lost Continent has been totally made over into the Land of Oz from the classic novels. These new additions, as well as a new backstory tying the park together, will update this park to be as beloved as it was in the past
-
The new WDWMAGIC iOS app is here!
Stay up to date with the latest Disney news, photos, and discussions right from your iPhone. The app is free to download and gives you quick access to news articles, forums, photo galleries, park hours, weather and Lightning Lane pricing. Learn More -
Welcome to the WDWMAGIC.COM Forums!
Please take a look around, and feel free to sign up and join the community.
You are using an out of date browser. It may not display this or other websites correctly.
You should upgrade or use an alternative browser.
You should upgrade or use an alternative browser.
Islands of Adventure - A TMNT Project
- Thread starter mickeyfan5534
- Start date
Long ago, Marina Pharos dreamed of being a traveler and exploring new lands. And she did exactly that! During her travels, she found an enchanted lighthouse that has portals to different worlds. Living in the lighthouse, she is the owner of the enchanted book that powers the beckon of the greatest of adventures with brave heroes and heroines, magical settings, and valuable lessons to learn when they are written. Marina has brought forth these seven worlds and their great leaders: the Intelligent Avatar Aang, the Daring hero Dirk, the Kind actress Ann Darrow, the Brave dinosaur handler Owen Grady, the Wise wizard Albus Dumbledore, the Good witch Glinda, and the Creative trickster The Cat in the Hat. The leaders of these lands have opened their borders in unity for all to discover their own Islands of Adventure, much as Marina did all that time ago. Now, people come to Island of Adventure everyday to live what Marina and the 7 leaders created for people to escape reality and just have fun.
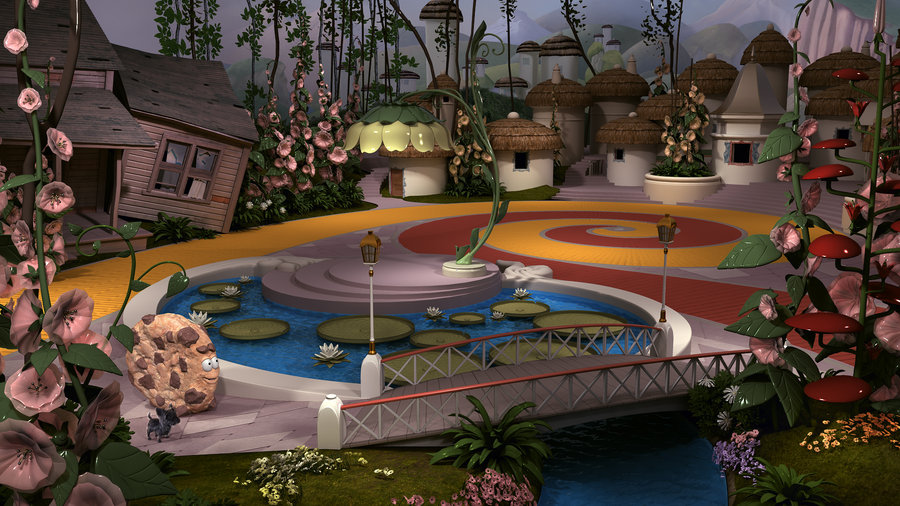
The Land of Oz
Replacing the Lost Continent is The Land of Oz, based on L. Frank Baum's classic novels. This area is split into 5 areas: Munchkin Country, the Poppy Field, Winkie Country, Quadling Country, and The Emerald City. These 5 areas make up a miniature recreation of Baum's beloved land and are filled with new adventures to enjoy.
Munchkin Country
The lively Munchkin Country is open for all to come and have fun to celebrate Princess Ozma’s Coronation Jubillee! With excitement all over the land, you are sure to have fun wherever you go in the festival they created.
Blooming Flower Drop
Glinda has added a little magic to Munchkinland with a new magical flower garden that can take people of all sorts on a drop adventure. There are 2 flower towers with 5 seats of 2 in each that take you up and down 25” in small drops.
Lilypad Splash
Hop on a lilypad and get ready to get wet as this is a bumper care style ride! Control your lilypad to hit other people and get them splashed on! Using a motor at the bottom of the lilypad you can go anywhere in the lake and splash around.
Munchkin’s Bakery
The Munchkins have opened up shop in Munchkinland with their very own bakery. You can find lots of sweet treats here. For example there are cookies of all flavors, brownies, breads, cakes, and more delicious treats. Come on down and try them all for yourself.
Dorothy’s Delights

Doroty has her own snack cart in front of her house that crashed in Munchkinland. It sells everything that will keep you energized for your day. For example, fruit, vegetables, water, and more.
Festival Tent
With the anniversary of Princess Ozma’s Coronation happening, the Munchkins are selling memorabilia to celebrate this event. There are shirts, hats, and much to celebrate this special event.
Munchkin Feast

This quick service restaurant brings together everyone in the land to have a feast. You can order traditional Thanksgiving-type food like turkey, chicken, ham, veggies, and more. Seating will be scattered outside to let people eat and enjoy the atmosphere around them.
Quadling Country
In the south of Oz lies Quadling Country. This land is filled with trees, rivers, and animals galore. There is even royalty with Glinda’s castle lying right in the middle of the land. Come take a sneak peek of what to expect in Quadling Country.
Glinda’s Palace

Princess Ozma’s Coronation Jubilee is here and Glinda has opened her ruby red palace for all people to come and enjoy the delights of Quadling Country. The exterior of the palace has bright, ruby red towers and white, stone walls. The interior has 5 rooms which include 3 dining rooms, the lobby, and the shop. The lobby has sleek, white walls with marble floors. Once you check in the lobby, you will be seated in one of the three rooms: the main dining hall, the terrace, and the ballroom.
The Dining Hall has lots of paintings and sculptures that fill the room with life showing the history of Quadling Country and Glinda's life. The Terrace is right outside the building with a view of the lagoon and the rest of the park while you enjoy your meal. The ballroom has large murals in the ceiling and marble walls all around. Every couple hours, dancers come dance in the middle of the room to entertain guests and add a little magic to the dining experience.
Glinda’s Trinkets
Inside the castle there are many interesting artifacts of Oz history that Glinda and the people of Quadling Country put on sale for people to purchase. There is everything from a simple snow globe of the castle to a 4ft tall replica of Glinda’s castle! There is much to see and buy at Glinda’s Trinkets.
China’s Delicacies

This little shop hidden in Quadling Country has all the delicate kitchenware inspired by the wonderful land of Oz. It has bowls, plates, and so much more kitchenware. But be careful! You don’t want to chip the porcelain!
Jinxland Garden
Tucked in the corner of Quadling Country is Jinxland Garden. This small quick service restaurant sits in the middle of a garden with fountains, statues, and tables to have your own little picnic with the Jinxland food. Jinxland food consists of all healthy options like salads, smoothies, fruits, and much more to keep your energy up for the day.
Winkie Country

Your journeys through Oz take a darker turn beyond the gates of the Emerald City. The dark forests of the former domain of The Wicked Witch of the West indeed still hold some dark terrors to discover.
The Wicked Witch of the West
View attachment 485088
This rollercoaster sends riders on a wild flight through and around the rundown castle of the Wicked Witch of the West.
The Time Dragon Clock
The ancient Time Dragon Clock, an honored artifact of the Winkies, has been taken over by the few supporters of The Wicked Witch of the West remaining. It is here that they tell the story of Elphaba, the Wicked Witch of the West.
This is an abbreviated, hour-long performance of Wicked depicting largely the events of Act 1 with elements of Act 2 toward the end.
Time Dragon Clock Souvenirs
Near the Time Dragon Clock, an enterprising supporter of the Wicked Witch of the West sells their wears. This is the perfect place to stop and get your fill of Wicked merchandise.
Castle Treasures
Near the exit of The Wicked Witch of the West is a cart selling all sorts of merchandise themed to Winkie Country.
Wicked Treats
On the border of The Land of Oz and The Wizarding World of Harry Potter lies a small shack serving delightful treats inspired by the many denizens and locals of Oz. However, the most famous of these treats are Witch Brooms, fried cream-filled pastries on a stick decorated to appear like a broom.
Poppy Field

This is a simple children's play area themed to the Poppy Fields.
Emerald City

The key land of Oz is open to all with thrilling adventures and new shops and dining to try. Don’t forget to wear green!
The Emerald Wand of Oz
Emerald City E-Ticket
Dorothy, Toto, the Scarecrow, the Tin Woodman, and the Cowardly Lion embark on an adventure across the four lands of Oz to find the perfect gift for Ozma’s Coronation Jubillee: a magic wand said to hold some of the most powerful magic in all of Oz. However, it’s a journey full of peril: Hammerheads, Khalidas, puppets controlled by a cruel puppet master, and more. Worst of all: the Nome King himself is after the wand as well! Will they succeed in their quest? Find out for yourself in this trackless dark ride filled with settings and animatronics that faithfully recreate John R. Neil’s beloved artwork in an original story inspired by L. Frank Baum’s beloved novels.
Green Sweets
This candy shop has everything green. With green lollipops, green candy apples, and much more. There are even green milkshakes that are mint flavored. Come try it out in Emerald City.
Green Couture

This store has outfits galore but all in the color green. You can buy outfits inspired by the movie and Wicked, shirts relating to the park and land, and even your own pair of green glasses to look your absolute best in Emerald City.
Princess Ozma's Jubillee

The Emerald City bursts into celebration in this atmosphere show featuring the numerous characters of the Land of Oz in their celebration of Ozma's Coronation Jubilee.
Encounters with the Citizens of Oz
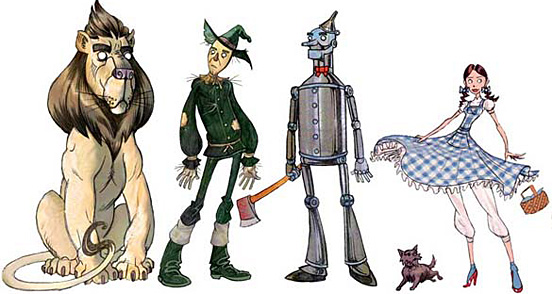
The beloved citizens of Oz are always out looking for adventure. Dorothy Gale may be enjoying the day in Quadling Country, while Princess Ozma, Glinda the Good Witch of the South, and The Wizard of Oz greet the visitors to the Emerald City. Meanwhile, the Tin Man and the Cowardly Lion may be exploring the forests of Winkie Country or the Scarecrow and Scraps, the Patchwork Girl might be bounding about Munchkin Country. All these and more beloved characters from L. Frank Baum's classic series will explore the Land of Oz throughout the day.
Replacing the Lost Continent is The Land of Oz, based on L. Frank Baum's classic novels. This area is split into 5 areas: Munchkin Country, the Poppy Field, Winkie Country, Quadling Country, and The Emerald City. These 5 areas make up a miniature recreation of Baum's beloved land and are filled with new adventures to enjoy.
Munchkin Country
The lively Munchkin Country is open for all to come and have fun to celebrate Princess Ozma’s Coronation Jubillee! With excitement all over the land, you are sure to have fun wherever you go in the festival they created.
Blooming Flower Drop
Glinda has added a little magic to Munchkinland with a new magical flower garden that can take people of all sorts on a drop adventure. There are 2 flower towers with 5 seats of 2 in each that take you up and down 25” in small drops.
Lilypad Splash
Hop on a lilypad and get ready to get wet as this is a bumper care style ride! Control your lilypad to hit other people and get them splashed on! Using a motor at the bottom of the lilypad you can go anywhere in the lake and splash around.
Munchkin’s Bakery
The Munchkins have opened up shop in Munchkinland with their very own bakery. You can find lots of sweet treats here. For example there are cookies of all flavors, brownies, breads, cakes, and more delicious treats. Come on down and try them all for yourself.
Dorothy’s Delights
Doroty has her own snack cart in front of her house that crashed in Munchkinland. It sells everything that will keep you energized for your day. For example, fruit, vegetables, water, and more.
Festival Tent
With the anniversary of Princess Ozma’s Coronation happening, the Munchkins are selling memorabilia to celebrate this event. There are shirts, hats, and much to celebrate this special event.
Munchkin Feast
This quick service restaurant brings together everyone in the land to have a feast. You can order traditional Thanksgiving-type food like turkey, chicken, ham, veggies, and more. Seating will be scattered outside to let people eat and enjoy the atmosphere around them.
Quadling Country
In the south of Oz lies Quadling Country. This land is filled with trees, rivers, and animals galore. There is even royalty with Glinda’s castle lying right in the middle of the land. Come take a sneak peek of what to expect in Quadling Country.
Glinda’s Palace
Princess Ozma’s Coronation Jubilee is here and Glinda has opened her ruby red palace for all people to come and enjoy the delights of Quadling Country. The exterior of the palace has bright, ruby red towers and white, stone walls. The interior has 5 rooms which include 3 dining rooms, the lobby, and the shop. The lobby has sleek, white walls with marble floors. Once you check in the lobby, you will be seated in one of the three rooms: the main dining hall, the terrace, and the ballroom.
The Dining Hall has lots of paintings and sculptures that fill the room with life showing the history of Quadling Country and Glinda's life. The Terrace is right outside the building with a view of the lagoon and the rest of the park while you enjoy your meal. The ballroom has large murals in the ceiling and marble walls all around. Every couple hours, dancers come dance in the middle of the room to entertain guests and add a little magic to the dining experience.
Glinda’s Trinkets
Inside the castle there are many interesting artifacts of Oz history that Glinda and the people of Quadling Country put on sale for people to purchase. There is everything from a simple snow globe of the castle to a 4ft tall replica of Glinda’s castle! There is much to see and buy at Glinda’s Trinkets.
China’s Delicacies
This little shop hidden in Quadling Country has all the delicate kitchenware inspired by the wonderful land of Oz. It has bowls, plates, and so much more kitchenware. But be careful! You don’t want to chip the porcelain!
Jinxland Garden
Tucked in the corner of Quadling Country is Jinxland Garden. This small quick service restaurant sits in the middle of a garden with fountains, statues, and tables to have your own little picnic with the Jinxland food. Jinxland food consists of all healthy options like salads, smoothies, fruits, and much more to keep your energy up for the day.
Winkie Country
Your journeys through Oz take a darker turn beyond the gates of the Emerald City. The dark forests of the former domain of The Wicked Witch of the West indeed still hold some dark terrors to discover.
The Wicked Witch of the West
View attachment 485088
This rollercoaster sends riders on a wild flight through and around the rundown castle of the Wicked Witch of the West.
The Time Dragon Clock
The ancient Time Dragon Clock, an honored artifact of the Winkies, has been taken over by the few supporters of The Wicked Witch of the West remaining. It is here that they tell the story of Elphaba, the Wicked Witch of the West.
This is an abbreviated, hour-long performance of Wicked depicting largely the events of Act 1 with elements of Act 2 toward the end.
Time Dragon Clock Souvenirs
Near the Time Dragon Clock, an enterprising supporter of the Wicked Witch of the West sells their wears. This is the perfect place to stop and get your fill of Wicked merchandise.
Castle Treasures
Near the exit of The Wicked Witch of the West is a cart selling all sorts of merchandise themed to Winkie Country.
Wicked Treats
On the border of The Land of Oz and The Wizarding World of Harry Potter lies a small shack serving delightful treats inspired by the many denizens and locals of Oz. However, the most famous of these treats are Witch Brooms, fried cream-filled pastries on a stick decorated to appear like a broom.
Poppy Field
This is a simple children's play area themed to the Poppy Fields.
Emerald City
The key land of Oz is open to all with thrilling adventures and new shops and dining to try. Don’t forget to wear green!
The Emerald Wand of Oz
Emerald City E-Ticket
Dorothy, Toto, the Scarecrow, the Tin Woodman, and the Cowardly Lion embark on an adventure across the four lands of Oz to find the perfect gift for Ozma’s Coronation Jubillee: a magic wand said to hold some of the most powerful magic in all of Oz. However, it’s a journey full of peril: Hammerheads, Khalidas, puppets controlled by a cruel puppet master, and more. Worst of all: the Nome King himself is after the wand as well! Will they succeed in their quest? Find out for yourself in this trackless dark ride filled with settings and animatronics that faithfully recreate John R. Neil’s beloved artwork in an original story inspired by L. Frank Baum’s beloved novels.
Green Sweets
This candy shop has everything green. With green lollipops, green candy apples, and much more. There are even green milkshakes that are mint flavored. Come try it out in Emerald City.
Green Couture
This store has outfits galore but all in the color green. You can buy outfits inspired by the movie and Wicked, shirts relating to the park and land, and even your own pair of green glasses to look your absolute best in Emerald City.
Princess Ozma's Jubillee
The Emerald City bursts into celebration in this atmosphere show featuring the numerous characters of the Land of Oz in their celebration of Ozma's Coronation Jubilee.
Encounters with the Citizens of Oz
The beloved citizens of Oz are always out looking for adventure. Dorothy Gale may be enjoying the day in Quadling Country, while Princess Ozma, Glinda the Good Witch of the South, and The Wizard of Oz greet the visitors to the Emerald City. Meanwhile, the Tin Man and the Cowardly Lion may be exploring the forests of Winkie Country or the Scarecrow and Scraps, the Patchwork Girl might be bounding about Munchkin Country. All these and more beloved characters from L. Frank Baum's classic series will explore the Land of Oz throughout the day.
TheOriginalTiki
Well-Known Member
Republic City
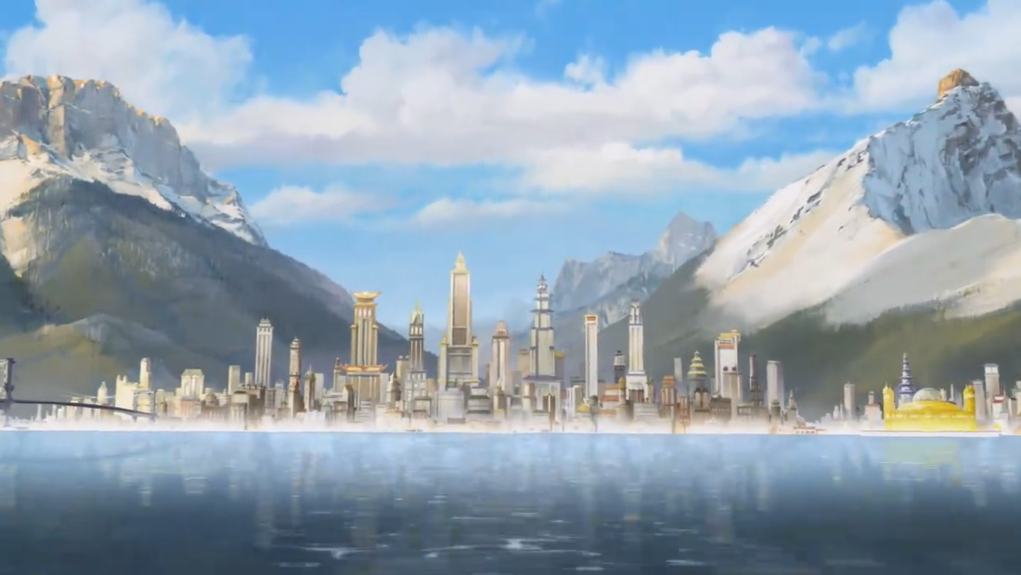
Located in the former footprint occupied by both Toon Lagoon and the old amphitheater, Republic City will capitalize on the newfound popularity of Avatar: The Last Airbender. Set between the iconic original series and the groundbreaking sequel series "The Legend of Korra", this new land is set ten years after the founding of Republic City by Avatar Aang and Firelord Zukko, roughly 30 years after "The Last Airbender". The Sato Corporation is just starting to roll out prototypes for Sato-Mobiles, and the excitement of the new invention is creating an electricity in the air and causing visitors from all over to travel to the city that famously bound the Earth, Water, FIre, and Air nations under one banner. Behind the glitz and glamour of the festivities, a dark underground force is laying in wait to strike against Sato and his corporations. Much like every great Avatar villain, these people have very realistic motivations...but we'll meet them later.
Republic City will feature two main attractions. The headliner, "Avatar: The Siege of Sato", is an E Ticket coaster putting guests in the middle of an epic bending battle with starring appearances from Avatar Aang and Toph. The supporting attraction is "The Spirit Realms", a calm boat ride into the spirit world with Uncle Iroh as your guide. In addition, there will be many interactive bending elements that guests can pull up via the Universal app as well as two primary dining locations and one very famous cabbage cart.
Iroh's Tea Shop
Based upon the famous location in Ba Sing Sei, a young Varrick has franchised out Iroh's secret recopies for guests to enjoy in an ornate Japanese inspired tea house. The tea shop will be located in the former spot of the Comic Strip Cafe and also offer small food offerings like rice balls, mitsu soup, and tea cakes. Every so often, Fire Lord Zukko will go undercover as a server in the tea shop. Marked by his iconic scar, Zukko will humbly admit to his status as Firelord if asked, and is there to check in on the tea shop and make sure Varrick is running it to his uncle's standards. Every so often a walk-around Varrick will also come out to greet guests, with many "do the thing!" jokes worked into the actor's dialogue. Surrounded by a small waterfall and rock garden, the tea shop on the outskirts of Republic City will serve as the perfect entry point into the rest of the land.
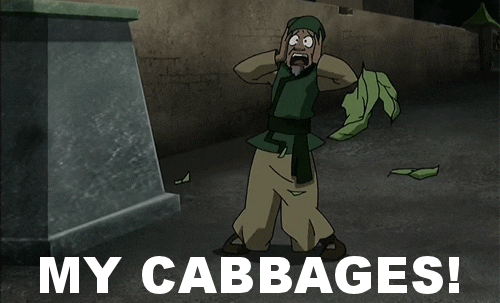
The Cabbage Cart
This is your one stop shop for the cabbage merchant's famous cabbage soup, a popular snack in Republic City. Every so often, a pre-planned mishap will cause the cabbage merchant's pile of cabbages to fall over, prompting his famous catchphrase.
International Marketplace
This food court will act as the hub of Republic City. It is here where guests will be able to get their hands on special foods from all over the four nations. Spread out into four sections, each offering its own seating area and cart to get your food from.
Air Nation: Dumplings, onion banana juice, sweet buns
Water Tribe: Five flavored soup, seaweed noodles, kale cookies, blubbered seal jerky
Earth Kingdom: Bison steak, egg custard tart, Jook, unfried dough, cactus juice
Fire Nation: Flaming fire flakes, Sizzle-crisps, Komodo sausage, super spicy souffle, watermelon juice
Air Temple Island

Located on the outskirts of Republic City, Air Temple Island will be a transition area into Skull Island and will feature an ornate garden and statues of the past Avatars which will blend beautifully into the ruins of the Kong exterior.
Bending stations
Using smart phone scanners on the Universal app, guests will be able to "bend" the elements at four different bending stations located throughout Republic City. This will be used as a small interactive element and not meant to tie into the overall storyline of the land.
Firebending station: Use your phone to find sensors that will light a series of lanterns and candles. An especially beautiful experience at night. This station will take place in a fountain courtyard similar to the one featured in "Tales of Ba Sing Sei"

Waterbending station: Located on the edge of the giant Aang statue and the entrance to the Spirit Realms boat ride, the waterbending station will feature a variety of different water fountains and jets coming out from the lagoon that guests can scan.
Earthbending sation: Boulders will be cracked in half and mounds of dirt will rise up into mighty walls of earth as guests scan the sensors in this construction zone that Toph has turned into an Earthbending training center.
Airbending station: Naturally located within Air Temple Island, the airbending station will feature a variety of wind-related activities such as flying kites and playing large flutes all through scanning hidden air cannons within the temple.
Avatar: The Spirit Realms
Located at the base of the Aang statue, this two minute boat ride in the former spot of Popeye and Bluto's Bilge Rat Barges will feature many projection effects as guests calmly flow into a rift into the spirit world caused by the high levels of spiritual energy centered around Aang's statue. Guests start their ride in a botanical garden and quickly go into a tunnel and find themselves in the spirit world. Guided by the bunny spirit we'll later come to know as "Bum-Ju" in Legend of Korra, we hear the strings of a guitar strumming a very familiar song.
As we float pats waterfalls and rolling cliff sides, more and more spirits join us as we make our way towards the voice that now seems to accompany the music. In the finale of the brief but thought provoking attractions, guests come face to face with Uncle Iroh himself, singing the famous poem "Leaves from the Vine" while greeting guests. This will be among the most advanced AA figures in all of Universal Orlando's parks. Iroh is able to dip his toe into the water very close to the guests, take a drink from his tea cup as well as refill the cup from a tea pot, realistically play the guitar, and talk directly to the guests. The room with Iroh wraps around the AA, giving much more face-time with the character than the obvious inspiration in the Shaman of Song.
Leaves from the vine
falling so slow
Like tiny fragile shells
Drifting in the foam
Little solider boy
Come marching home
Brave solider boy
Come marching home
Avatar: The Siege of Sato

You are the newest recruits for the Sato corporation, tasked with being on first assembly line for the official public roll-out of the Sato-Mobile. As you wrap around the outside of the factory in the queue, a growing sense of anxiety comes over you as you begin to wonder just what you're getting yourself into. Within the factory's foyer, a young Sato greets you on a giant screen and welcomes you on to the assembly line, assuring you that your work will be fundemental to the future development of Republic City. Suddenly, the lights go out another man comes on the screen. This is Garryn, played by Giancarlo Esposito.

Garryn explains that in the construction of Sato's factory, an accident occurred killing a dozen men, including his son. In the fallout, Avatar Aang spoke out against the use of non-benders in dangerous factory and construction work positions, leading to the status quo of Benders having those jobs exlcusively in the Korra timeline. The thing is, while the loss of Garryn's son was a hard pill to swallow, the loss of his construction union's livelihood ruined him and made him a laughing stock of the Republic City construction force. Garryn is now holding the new recruits for ransom, to make up for the lost income and to prove a point that while Aang's intentions in his leadership are noble, his heart-on-sleeve ideals have led to far more suffering than he's realized.
Guests are then escorted into two different storage rooms before being broken out via metal bending by a cast member acting as a member of the Republic City police force. They inform guests that they're with the Avatar and are there to escort them to safety. Guests then hop aboard a Sato-Mobile and get ready to get in the middle of an epic Avatar battle.

The ride system will be the first major use of the S&S Axis Coaster, an innovative new coaster prototype that will be perfect for simulating different airbending and earthbending effects. The ride will take place entirely in one large room similar to Space Mountain or Revenge of the Mummy.

Guests roll into the factory assembly line filled with Sato-Mobiles, the exit on the other side of the large room. Garryn and his men stand in our way. An AA of Aang floats down to our level and ensures us he'll escort us to safety. Suddenly, Garryn smiles and presses a button, informing Aang that he's rigged our Sato-mobile to be remotely controlled by him via a magnetic technology. This sends us launching into the air, as the roof of the building comes peeling back revealing Toph. "Looks like you need some help there, Twinke Toes!"
From this point forward, it's a battle between Toph using her metal bending to try to control our car, Garryn remote controlling other Sato mobiles to try to ram into us, and Aang using his airbending to lift us up and out of dangerous situations. The track will be cleverly concealed to go from under the ground level to upwards along pillars and walls, minimizing the actual supports of the structure and making the layout far more unpredictable. In the finale of the attraction, a giant full sized Appa AA will swoop from the hole created in the roof and fly directly over us, causing Garryn's men to flee and leading to us making it to the exit.
The Siege of Sato will be a high tech, highly immersive coaster that will blend the thrills of a next generation coaster technology with the adreneline rush of being caught right in the middle of one of the series trademark battle scenes. With minimal but very impressive AAs and one giant set piece, this attraction will prove to be a very popular hit for Avatar fans and also a major draw for coaster junkies.
Located in the former footprint occupied by both Toon Lagoon and the old amphitheater, Republic City will capitalize on the newfound popularity of Avatar: The Last Airbender. Set between the iconic original series and the groundbreaking sequel series "The Legend of Korra", this new land is set ten years after the founding of Republic City by Avatar Aang and Firelord Zukko, roughly 30 years after "The Last Airbender". The Sato Corporation is just starting to roll out prototypes for Sato-Mobiles, and the excitement of the new invention is creating an electricity in the air and causing visitors from all over to travel to the city that famously bound the Earth, Water, FIre, and Air nations under one banner. Behind the glitz and glamour of the festivities, a dark underground force is laying in wait to strike against Sato and his corporations. Much like every great Avatar villain, these people have very realistic motivations...but we'll meet them later.
Republic City will feature two main attractions. The headliner, "Avatar: The Siege of Sato", is an E Ticket coaster putting guests in the middle of an epic bending battle with starring appearances from Avatar Aang and Toph. The supporting attraction is "The Spirit Realms", a calm boat ride into the spirit world with Uncle Iroh as your guide. In addition, there will be many interactive bending elements that guests can pull up via the Universal app as well as two primary dining locations and one very famous cabbage cart.
Iroh's Tea Shop
Based upon the famous location in Ba Sing Sei, a young Varrick has franchised out Iroh's secret recopies for guests to enjoy in an ornate Japanese inspired tea house. The tea shop will be located in the former spot of the Comic Strip Cafe and also offer small food offerings like rice balls, mitsu soup, and tea cakes. Every so often, Fire Lord Zukko will go undercover as a server in the tea shop. Marked by his iconic scar, Zukko will humbly admit to his status as Firelord if asked, and is there to check in on the tea shop and make sure Varrick is running it to his uncle's standards. Every so often a walk-around Varrick will also come out to greet guests, with many "do the thing!" jokes worked into the actor's dialogue. Surrounded by a small waterfall and rock garden, the tea shop on the outskirts of Republic City will serve as the perfect entry point into the rest of the land.
The Cabbage Cart
This is your one stop shop for the cabbage merchant's famous cabbage soup, a popular snack in Republic City. Every so often, a pre-planned mishap will cause the cabbage merchant's pile of cabbages to fall over, prompting his famous catchphrase.
International Marketplace
This food court will act as the hub of Republic City. It is here where guests will be able to get their hands on special foods from all over the four nations. Spread out into four sections, each offering its own seating area and cart to get your food from.
Air Nation: Dumplings, onion banana juice, sweet buns
Water Tribe: Five flavored soup, seaweed noodles, kale cookies, blubbered seal jerky
Earth Kingdom: Bison steak, egg custard tart, Jook, unfried dough, cactus juice
Fire Nation: Flaming fire flakes, Sizzle-crisps, Komodo sausage, super spicy souffle, watermelon juice
Air Temple Island
Located on the outskirts of Republic City, Air Temple Island will be a transition area into Skull Island and will feature an ornate garden and statues of the past Avatars which will blend beautifully into the ruins of the Kong exterior.
Bending stations
Using smart phone scanners on the Universal app, guests will be able to "bend" the elements at four different bending stations located throughout Republic City. This will be used as a small interactive element and not meant to tie into the overall storyline of the land.
Firebending station: Use your phone to find sensors that will light a series of lanterns and candles. An especially beautiful experience at night. This station will take place in a fountain courtyard similar to the one featured in "Tales of Ba Sing Sei"
Waterbending station: Located on the edge of the giant Aang statue and the entrance to the Spirit Realms boat ride, the waterbending station will feature a variety of different water fountains and jets coming out from the lagoon that guests can scan.
Earthbending sation: Boulders will be cracked in half and mounds of dirt will rise up into mighty walls of earth as guests scan the sensors in this construction zone that Toph has turned into an Earthbending training center.
Airbending station: Naturally located within Air Temple Island, the airbending station will feature a variety of wind-related activities such as flying kites and playing large flutes all through scanning hidden air cannons within the temple.
Avatar: The Spirit Realms
Located at the base of the Aang statue, this two minute boat ride in the former spot of Popeye and Bluto's Bilge Rat Barges will feature many projection effects as guests calmly flow into a rift into the spirit world caused by the high levels of spiritual energy centered around Aang's statue. Guests start their ride in a botanical garden and quickly go into a tunnel and find themselves in the spirit world. Guided by the bunny spirit we'll later come to know as "Bum-Ju" in Legend of Korra, we hear the strings of a guitar strumming a very familiar song.
As we float pats waterfalls and rolling cliff sides, more and more spirits join us as we make our way towards the voice that now seems to accompany the music. In the finale of the brief but thought provoking attractions, guests come face to face with Uncle Iroh himself, singing the famous poem "Leaves from the Vine" while greeting guests. This will be among the most advanced AA figures in all of Universal Orlando's parks. Iroh is able to dip his toe into the water very close to the guests, take a drink from his tea cup as well as refill the cup from a tea pot, realistically play the guitar, and talk directly to the guests. The room with Iroh wraps around the AA, giving much more face-time with the character than the obvious inspiration in the Shaman of Song.
Leaves from the vine
falling so slow
Like tiny fragile shells
Drifting in the foam
Little solider boy
Come marching home
Brave solider boy
Come marching home
Avatar: The Siege of Sato
You are the newest recruits for the Sato corporation, tasked with being on first assembly line for the official public roll-out of the Sato-Mobile. As you wrap around the outside of the factory in the queue, a growing sense of anxiety comes over you as you begin to wonder just what you're getting yourself into. Within the factory's foyer, a young Sato greets you on a giant screen and welcomes you on to the assembly line, assuring you that your work will be fundemental to the future development of Republic City. Suddenly, the lights go out another man comes on the screen. This is Garryn, played by Giancarlo Esposito.
Garryn explains that in the construction of Sato's factory, an accident occurred killing a dozen men, including his son. In the fallout, Avatar Aang spoke out against the use of non-benders in dangerous factory and construction work positions, leading to the status quo of Benders having those jobs exlcusively in the Korra timeline. The thing is, while the loss of Garryn's son was a hard pill to swallow, the loss of his construction union's livelihood ruined him and made him a laughing stock of the Republic City construction force. Garryn is now holding the new recruits for ransom, to make up for the lost income and to prove a point that while Aang's intentions in his leadership are noble, his heart-on-sleeve ideals have led to far more suffering than he's realized.
Guests are then escorted into two different storage rooms before being broken out via metal bending by a cast member acting as a member of the Republic City police force. They inform guests that they're with the Avatar and are there to escort them to safety. Guests then hop aboard a Sato-Mobile and get ready to get in the middle of an epic Avatar battle.
The ride system will be the first major use of the S&S Axis Coaster, an innovative new coaster prototype that will be perfect for simulating different airbending and earthbending effects. The ride will take place entirely in one large room similar to Space Mountain or Revenge of the Mummy.
Guests roll into the factory assembly line filled with Sato-Mobiles, the exit on the other side of the large room. Garryn and his men stand in our way. An AA of Aang floats down to our level and ensures us he'll escort us to safety. Suddenly, Garryn smiles and presses a button, informing Aang that he's rigged our Sato-mobile to be remotely controlled by him via a magnetic technology. This sends us launching into the air, as the roof of the building comes peeling back revealing Toph. "Looks like you need some help there, Twinke Toes!"
From this point forward, it's a battle between Toph using her metal bending to try to control our car, Garryn remote controlling other Sato mobiles to try to ram into us, and Aang using his airbending to lift us up and out of dangerous situations. The track will be cleverly concealed to go from under the ground level to upwards along pillars and walls, minimizing the actual supports of the structure and making the layout far more unpredictable. In the finale of the attraction, a giant full sized Appa AA will swoop from the hole created in the roof and fly directly over us, causing Garryn's men to flee and leading to us making it to the exit.
The Siege of Sato will be a high tech, highly immersive coaster that will blend the thrills of a next generation coaster technology with the adreneline rush of being caught right in the middle of one of the series trademark battle scenes. With minimal but very impressive AAs and one giant set piece, this attraction will prove to be a very popular hit for Avatar fans and also a major draw for coaster junkies.
Tux
Well-Known Member
Land Overview
.jpeg")
Taking over the now defunct Marvel Super Hero Island, is now a land dedicated to the rather nostalgic and entertaining Ethereld's Kingdom, which is based off Don Bluth's Dragon's Lair. Watch as you step as you begin to enter this rather charming world.
If you choose to take the path from Port Of Entry, you'll then proceed to walk across a wooden bridge that stands over a bubbling river produced by a waterfall, where near the willow trees planted in the area, you can spot Marina Pharos's lighthouse from the area.
Heading across the bridge, you'll then walk through a short path with some trees and bushes, and if you look closely, you'll notice ancient runes carved into the trees. After walking a little further, you'll then approach a typical medieval fortress with a grid gate with AA guards watching over the area, who will have animations such as reloading their arrows, or firing their cannons.
Walking inside, there are two seperate sections of the land. One area consists of two seperate castles who join together at a symmetrical line that proceeds to blend the two together using moss and overgrowth to make it appear that the two castles are the flip side of the same coin. One of these castles has dark bricks anf is overall more ominous, with taller trees in the area casting shadows, the cawing (just sound effects btw) of crows who have made their nests their, and the overall miserable state of the castle, with it slowly crumbling away and bleeding back into nature once more, with trees growing over piles of bricks, moss consuming large parts of the wall, and the walls missing bricks. Meanwhile the other side is generally better maintained and has clearly been repaired in the fast few years. There are flowers planted in the area, but their growth has been maintained so they don't spread like wildfire. The castle is a light grey compared to the darker greys of the other side of the castle. Banners sway around the sides of the castle proudly, and the torches near it are lit.
The darker castle is The Mordroc Castle Match, a coaster elevator hybrid E-ticket, and the lighter castle is The Time Warp, which is an interactive dark ride.

Meanwhile, on the other side of the land, is the village. The village primarily takes after abandoned medieval scandanavian villages, with the houses primarily consisting of wooden structures and logs stuck together with straw thatched roofs, although we aren't actually using thatched roofs, that would be a hazard, it just looks thatched. The path around this area also primarily follows a dark wooden one instead of a dirt one. The first building on the way in is Hilda's Holstery, with The Treasury being placed towards the end of the land. The Garden Of Eden is placed right around a path that leads to the castle section, and The Armory and Dirk & Daphne's are placed vertically to eachother near the beginning of the area. Meanwhile, The Bard's Stage is placed right at the end of the area.
Once you exit this area, you board a more industrial based bridge that mainly utilizes steel and wires that looms over the ocean, and as you walk further, you begin to approach Republic City with the famous statue of Aang in the distance.
The Mordroc Castle Match

Queue
The Queue of The Mordroc Castle Matchup is primarily a hybrid of an outdoor and an indoor queue. The queue itself follows a limestone path going through the crumbling, overgrown ruins of Mordroc's Castle, with the outdoor segments mostly following through parts of the castle that have long since collapsed after the events of the game.
Throughout the queue, most of the walls having carvings into it recalling the events of the original, with occasional omages to the original attraction, with the halls containing a cauldron, some of the rolling balls, and a seemingly abandoned pot of gold, along with other remnants of the past signaling certain rooms and stages from the game. Along with the word based carvings on the wall, are carved in 'art' (just scratches that create lineart of certain figures during certain times.
The queue loop primarily consists of Celtic Based Music loops that lead up to the (un)loading station, which is a dark roon that mostly seems to have traces of excavation, with occasional traces of some coins on the floor with a tall ceiling to signify how the treasure's been long since removed, and right in the middle of the queue is the cracked, gradually rotting skeleton of Singe.
Mechanics/3 Tracks & Variants
The Mordroc Castle Match will use a combination of current technology used in the parks to create a new, thrilling experience by using a combination of three tracks total and by being a combination of an E L E V A T O R and a coaster.
How the base track works in the ride is that ride primarily connects to a track most of the time, however during the descension periods and the finale, the carts will load onto a seperate track connected to the elevator. The cart then has a lock mechanism that will prevent it from moving within the lift. The lift then uses similar functions to the one within the Tower Of Terror. For scenes within the vehicle, the vehicle will use the ' 'totally rare' ' and ' 'virtually unused ' ' screen technology {TM}.
As for how the three tracks method works, is that at the loading station, there is another rotating piece that rotates onto three different tracks clockwise. In order to prevent a similar incident to The Smiler, there's an system within the ride that'll alert whenever a cart is on the track, and there shouldn't be much issue with this one as it doesn't need to worry about the wind.
As for the effects in the ride, the ride primarily uses a combination of screens and animatronics. Screens are used for motions that would be impossible without paying for a more advanced yet more fragile AA or paying for a stunt AA and going past the budget, in which the screens are animated in traditional Don Bluth fashion, while less advanced movements like Dirk swinging his sword at Singe use regular AAs. The giant Singe at the end primarily uses forced perspective to make it look huge, since otherwise we'd have anothet broken mythological creature in the theme park.
While in the original draft, I wanted to use actual pyrotechnics in the ride, but I remembered how much a fire hazard that might be, so most of the flames are projection based like in Mickey's Runaway Railroad with Pete. If course, in case of an actual fire, there are always rails attatched to the tracks, and the elevators have fire service mode. Also, fog machines are used for Track 3, so the ride warns that anyone with a breathing problem shouldn't ride, and if someone has an asthma attack on the ride, the protocol is to stop the ride so that person can dismount the ride and get help if they need it.
Ride-Through

Once cart finally loads onto the right track, you start by descending down a dimly lit stone brick wall, and head up a chain lift.
In all versions, Dirk stands a couple feet away from the tracks and looks onto the challenges in front of them. However, different tracks lead to different traps. The first track will follow the challenge from the original and has a smaller lift and lower track compared to the others, which involves Dirk catching falling objects, in which said objects will bw hung from the ceiling via pulley, and as you head down the chain lift into the gold below, the objects will shift downwards before yanking up once the ride vehicle has passed by and a reset function activates. Meanwhile on the second track, the this time the area surrounding the path will be filled with Mudmen figures that animate to reach out to the riders, put to prevent injuries they've been placed down on a lower level. On this track, Dirk will swing his sword backwards before the cart dives down to give the illusion of an attack. On the third track, the coaster then races against a boat towards an axis with a chain attatched, which represents the Whirlpool room.
After all of this has been passed, the cart then takes another dip downwards, and surrounding the track are piles of gold, with a screen nearby showing Dirk sliding down Scrooge McDuck style, although he does bonk his head towards the end and he sways around for a bit before getting back on his feet and running around the corner. The ride then swivels, which leads to three different scenarios depending on the track you chose.
If you chose the first track, 'flames' (See: Mechanics) spurt out around the vehicle produced by Singe, and screens showing Dirk dodging the flames surround the room. in which the ride takes some small drops and swerves to the left multiple times before moving into a set with a sleeping singe inside, showing the true extent of the cave. If you chose the second track, this time it's multiple AA figures of Singe's tail thrashing around and AA figures of Dirk avoiding the thrashing, until you once again enter the set with the sleeping Singe. Meanwhile, on the third track, smoke is emitted around the area as Singe snores, while AA figures duck and are seen crawling throughout, before the vehicle then proceeds to board the next scene. The only track where the motion varies is on the second track where the ride swerves in multiple times to avoid being crushed before taking a left and once again entering the sleeping Singe scene.
The ride then proceeds to move around a couple of columns for a bit where an AA of Dirk hides behind the first one, as he seemingly peaks out to glance at the tied up Daphne, the ride then moves past several columns, where finally we see an AA of Dirk interact with Daphne, who was previously concealed using the other columns to block him out. She then says the iconic "Get the key, find the magic sword!" and then smoke then floods in the room as Singe awakens. We then move past a pillar that has a figure of Dirk hiding behind it. The vehicles then descend as an AA of Singe, using an effect similar to the Trex effect in the Jurassic Park Ride, pops out and lunges. The ride descends down further and swerves to the left, where another AA of Singe approaches, snarling. The ride vehicles then proceed to board another elevator.
The elevator then proceeds upward, and the screens show a skyline overview of parts of Singe's hoard, as Singe crawls on top of his large hoard to greet us, as it rises up, he roars and puffs smoke, as we disembark onto the hoard, and a large AA consisting of the upper torso, head, and claws lunges out as the ride vehicles head down a slope near a pillar, and as you head down, a large boom is heard (created from the speaker system). As the ride vehicle speeds by, a large fragment of the pillar you just passed can be seen, as we swerve to the right and pass by another pillar, and the effect repeats.

The ride the haults to an AA dirk pulling the sword out of one of the hoard piles, and then proceeds to speed off once Singe roars, and the ride vehicles then board the elevator once again, with the screens displaying Singe and Dirk fighting each other, and once the ride vehicles are released, the ride heads fowards for a bit before dipping down a slope into the last scene where all three tracks are in the same room. The area is the giant horde with the pillars placed all over, and in the center of it all is the AAs of Singe, Dirk, and Daphne, as Dirk impales Singe, killing him with a final shriek. The ride vehicles slow down, and the switch onto the track which leads directly back to the loading station.
Hilda's Holstery

Hilda, The viking wife of Ethereld and Daphne's mother, has opened a holstery of her own since the events of Dragon's Lair 2 so she could share her brewing with the citizens of the kingdom. The restaurant exterior takes the form of a large medieval estate building with the upper parts and towers of the building consisting of brown and white Tupor architecture and with the lower parts consisting of stone bricks. Inside the Holstery, the interior takes after a dimly lit medieval tavern. The restaurant mainly sells Scandanavian dishes and a variety of Craft Beer, and uses two different menus for dining and drinking respectively. Such menu items involve Pinnekjøtt, Swedish Meatballs, Beef Stroganoff, Pickles Herrings, and the likes, while the craft beer menu ranges from Brown Ale, Czech Pilsener, India Pale Ale, to Hefewizen, Lager, and Witbier.

Viking reenactments perform on a stage at this location, and an AA of Hilda tucked in a chair, sectioned off from the guests near the stage, will talk every now and then, commenting on the skits on the stage, lampshading parts of the established universe, or getting angry. All of this is added to make the restaurant stand out more as it is the only Table Service restaurant in the entire land.
DIRK & DAPHNE'S DESSERTS
After the events of the three established films, Dirk, Daphne, and their kids have settled down and opened a bakery together as a family business of sorts. The quick service dining area can be found almost immediately upon entering the area, with it being the second building on the left. The quick service area takes the form of a medieval style bakery, with a seating area outside. Many of the food that can be brought in store are displayed around in certain parts of the interior along with the glass case at the register. Inside the bakery, you can eavesdrop on the chatter of the family as they make their craft. The restaurant primarily sells cookies, breadboxes, and pastries along with hot drinks.
The Garden Of Eden

The Garden Of Eden is reutilized from the second game with it fitting into the setting due to the connections between Islam and Medieval Europe. The Garden Of Eden can be found right around next to Hilda's Holstery similarly to how most medieval estates had gardens near them.
A large variety of flora is grown throughout this area, with a large variety of multiple specimens from different areas of the world. The paths around the area have Islamic Medieval Art patterns across them. The stand that sells the food consists of limestone square rooms, with faded colored archways covering the entryway. The stand sells various islamic dishes like Turkish style eggs, Rice pudding with dates, and Syrian bread. Seating arrangements are placed around the area for those who wish to eat around there.
The Armory
An medieval armory that's present in the village area of the land, with a matching interior displaying historical displays of armor sets, weapons, defense strategies, and torture devices. Of course, the interior of this medieval based armory is medieval based. This was the Armory where Dirk and many other knights have gotten their armor tailored from over the years. The shop also doubles as a museum as I stated above, with it going through the history of the warfare during medieval times, and showing the overall gritty nature of it all.
The store itself primarily sells clothing items within the store, along with merchandise surrounding the games. It's possible to also commission a custom made sword or shield from here as well, although it's a very expensive option.
Please do note that the museum sections and the sales sections of the store are properly seperate. All items seen are rented out from other museums, and then the displays are rotated for other, newer items.
The Treasury

As you may be wondering, you may be questioning why the loading room where Singe's skeleton room is was so barren. The Treasury is the explanation, as after Singe and Mordroc were slain, the castle had it's gold stripped from it and it was invested into the Treasury after Singe had been killed, and now it has been finally opened so all may have access to it. The store itself mainly functions as souvenir shop, selling merchandise from the games, and merchandise about the park.
The interior of the shop primarily is white, with birch wood floors. For aesthetic purposes, the check outs of the store are designed after bank teller lines, but medieval styled. Replicas of paintings, pottery, and gemstones are placed around in displays around the area, with the items supposed to have came from Singe's hoard.
The Bard's Stage

The stage for this particular show, the only one in the entire land, is fairly simplistic with it being simply a wooden stage with banners attatched to the back and with, of course, curtains and a backdrop in the back. Mostly everything in the land so far has been mostly focused on the first and second game, so how about we finally give the third game a chance?
The show itself is mostly a comedic retelling of the plot of Dragon's Lair 3, using a narrator character known as the bard. The show allows the cast member performers to make up their own interpretations and improvise, but there's a default script incase they can't think of anything. The show primarily uses poor prop/set design to set up gags or just lampshades the original.
Taking over the now defunct Marvel Super Hero Island, is now a land dedicated to the rather nostalgic and entertaining Ethereld's Kingdom, which is based off Don Bluth's Dragon's Lair. Watch as you step as you begin to enter this rather charming world.
If you choose to take the path from Port Of Entry, you'll then proceed to walk across a wooden bridge that stands over a bubbling river produced by a waterfall, where near the willow trees planted in the area, you can spot Marina Pharos's lighthouse from the area.
Heading across the bridge, you'll then walk through a short path with some trees and bushes, and if you look closely, you'll notice ancient runes carved into the trees. After walking a little further, you'll then approach a typical medieval fortress with a grid gate with AA guards watching over the area, who will have animations such as reloading their arrows, or firing their cannons.
Walking inside, there are two seperate sections of the land. One area consists of two seperate castles who join together at a symmetrical line that proceeds to blend the two together using moss and overgrowth to make it appear that the two castles are the flip side of the same coin. One of these castles has dark bricks anf is overall more ominous, with taller trees in the area casting shadows, the cawing (just sound effects btw) of crows who have made their nests their, and the overall miserable state of the castle, with it slowly crumbling away and bleeding back into nature once more, with trees growing over piles of bricks, moss consuming large parts of the wall, and the walls missing bricks. Meanwhile the other side is generally better maintained and has clearly been repaired in the fast few years. There are flowers planted in the area, but their growth has been maintained so they don't spread like wildfire. The castle is a light grey compared to the darker greys of the other side of the castle. Banners sway around the sides of the castle proudly, and the torches near it are lit.
The darker castle is The Mordroc Castle Match, a coaster elevator hybrid E-ticket, and the lighter castle is The Time Warp, which is an interactive dark ride.
Meanwhile, on the other side of the land, is the village. The village primarily takes after abandoned medieval scandanavian villages, with the houses primarily consisting of wooden structures and logs stuck together with straw thatched roofs, although we aren't actually using thatched roofs, that would be a hazard, it just looks thatched. The path around this area also primarily follows a dark wooden one instead of a dirt one. The first building on the way in is Hilda's Holstery, with The Treasury being placed towards the end of the land. The Garden Of Eden is placed right around a path that leads to the castle section, and The Armory and Dirk & Daphne's are placed vertically to eachother near the beginning of the area. Meanwhile, The Bard's Stage is placed right at the end of the area.
Once you exit this area, you board a more industrial based bridge that mainly utilizes steel and wires that looms over the ocean, and as you walk further, you begin to approach Republic City with the famous statue of Aang in the distance.
The Mordroc Castle Match
Queue
The Queue of The Mordroc Castle Matchup is primarily a hybrid of an outdoor and an indoor queue. The queue itself follows a limestone path going through the crumbling, overgrown ruins of Mordroc's Castle, with the outdoor segments mostly following through parts of the castle that have long since collapsed after the events of the game.
Throughout the queue, most of the walls having carvings into it recalling the events of the original, with occasional omages to the original attraction, with the halls containing a cauldron, some of the rolling balls, and a seemingly abandoned pot of gold, along with other remnants of the past signaling certain rooms and stages from the game. Along with the word based carvings on the wall, are carved in 'art' (just scratches that create lineart of certain figures during certain times.
The queue loop primarily consists of Celtic Based Music loops that lead up to the (un)loading station, which is a dark roon that mostly seems to have traces of excavation, with occasional traces of some coins on the floor with a tall ceiling to signify how the treasure's been long since removed, and right in the middle of the queue is the cracked, gradually rotting skeleton of Singe.
Mechanics/3 Tracks & Variants
The Mordroc Castle Match will use a combination of current technology used in the parks to create a new, thrilling experience by using a combination of three tracks total and by being a combination of an E L E V A T O R and a coaster.
How the base track works in the ride is that ride primarily connects to a track most of the time, however during the descension periods and the finale, the carts will load onto a seperate track connected to the elevator. The cart then has a lock mechanism that will prevent it from moving within the lift. The lift then uses similar functions to the one within the Tower Of Terror. For scenes within the vehicle, the vehicle will use the ' 'totally rare' ' and ' 'virtually unused ' ' screen technology {TM}.
As for how the three tracks method works, is that at the loading station, there is another rotating piece that rotates onto three different tracks clockwise. In order to prevent a similar incident to The Smiler, there's an system within the ride that'll alert whenever a cart is on the track, and there shouldn't be much issue with this one as it doesn't need to worry about the wind.
As for the effects in the ride, the ride primarily uses a combination of screens and animatronics. Screens are used for motions that would be impossible without paying for a more advanced yet more fragile AA or paying for a stunt AA and going past the budget, in which the screens are animated in traditional Don Bluth fashion, while less advanced movements like Dirk swinging his sword at Singe use regular AAs. The giant Singe at the end primarily uses forced perspective to make it look huge, since otherwise we'd have anothet broken mythological creature in the theme park.
While in the original draft, I wanted to use actual pyrotechnics in the ride, but I remembered how much a fire hazard that might be, so most of the flames are projection based like in Mickey's Runaway Railroad with Pete. If course, in case of an actual fire, there are always rails attatched to the tracks, and the elevators have fire service mode. Also, fog machines are used for Track 3, so the ride warns that anyone with a breathing problem shouldn't ride, and if someone has an asthma attack on the ride, the protocol is to stop the ride so that person can dismount the ride and get help if they need it.
Ride-Through
Once cart finally loads onto the right track, you start by descending down a dimly lit stone brick wall, and head up a chain lift.
In all versions, Dirk stands a couple feet away from the tracks and looks onto the challenges in front of them. However, different tracks lead to different traps. The first track will follow the challenge from the original and has a smaller lift and lower track compared to the others, which involves Dirk catching falling objects, in which said objects will bw hung from the ceiling via pulley, and as you head down the chain lift into the gold below, the objects will shift downwards before yanking up once the ride vehicle has passed by and a reset function activates. Meanwhile on the second track, the this time the area surrounding the path will be filled with Mudmen figures that animate to reach out to the riders, put to prevent injuries they've been placed down on a lower level. On this track, Dirk will swing his sword backwards before the cart dives down to give the illusion of an attack. On the third track, the coaster then races against a boat towards an axis with a chain attatched, which represents the Whirlpool room.
After all of this has been passed, the cart then takes another dip downwards, and surrounding the track are piles of gold, with a screen nearby showing Dirk sliding down Scrooge McDuck style, although he does bonk his head towards the end and he sways around for a bit before getting back on his feet and running around the corner. The ride then swivels, which leads to three different scenarios depending on the track you chose.
If you chose the first track, 'flames' (See: Mechanics) spurt out around the vehicle produced by Singe, and screens showing Dirk dodging the flames surround the room. in which the ride takes some small drops and swerves to the left multiple times before moving into a set with a sleeping singe inside, showing the true extent of the cave. If you chose the second track, this time it's multiple AA figures of Singe's tail thrashing around and AA figures of Dirk avoiding the thrashing, until you once again enter the set with the sleeping Singe. Meanwhile, on the third track, smoke is emitted around the area as Singe snores, while AA figures duck and are seen crawling throughout, before the vehicle then proceeds to board the next scene. The only track where the motion varies is on the second track where the ride swerves in multiple times to avoid being crushed before taking a left and once again entering the sleeping Singe scene.
The ride then proceeds to move around a couple of columns for a bit where an AA of Dirk hides behind the first one, as he seemingly peaks out to glance at the tied up Daphne, the ride then moves past several columns, where finally we see an AA of Dirk interact with Daphne, who was previously concealed using the other columns to block him out. She then says the iconic "Get the key, find the magic sword!" and then smoke then floods in the room as Singe awakens. We then move past a pillar that has a figure of Dirk hiding behind it. The vehicles then descend as an AA of Singe, using an effect similar to the Trex effect in the Jurassic Park Ride, pops out and lunges. The ride descends down further and swerves to the left, where another AA of Singe approaches, snarling. The ride vehicles then proceed to board another elevator.
The elevator then proceeds upward, and the screens show a skyline overview of parts of Singe's hoard, as Singe crawls on top of his large hoard to greet us, as it rises up, he roars and puffs smoke, as we disembark onto the hoard, and a large AA consisting of the upper torso, head, and claws lunges out as the ride vehicles head down a slope near a pillar, and as you head down, a large boom is heard (created from the speaker system). As the ride vehicle speeds by, a large fragment of the pillar you just passed can be seen, as we swerve to the right and pass by another pillar, and the effect repeats.
The ride the haults to an AA dirk pulling the sword out of one of the hoard piles, and then proceeds to speed off once Singe roars, and the ride vehicles then board the elevator once again, with the screens displaying Singe and Dirk fighting each other, and once the ride vehicles are released, the ride heads fowards for a bit before dipping down a slope into the last scene where all three tracks are in the same room. The area is the giant horde with the pillars placed all over, and in the center of it all is the AAs of Singe, Dirk, and Daphne, as Dirk impales Singe, killing him with a final shriek. The ride vehicles slow down, and the switch onto the track which leads directly back to the loading station.
Hilda's Holstery
Hilda, The viking wife of Ethereld and Daphne's mother, has opened a holstery of her own since the events of Dragon's Lair 2 so she could share her brewing with the citizens of the kingdom. The restaurant exterior takes the form of a large medieval estate building with the upper parts and towers of the building consisting of brown and white Tupor architecture and with the lower parts consisting of stone bricks. Inside the Holstery, the interior takes after a dimly lit medieval tavern. The restaurant mainly sells Scandanavian dishes and a variety of Craft Beer, and uses two different menus for dining and drinking respectively. Such menu items involve Pinnekjøtt, Swedish Meatballs, Beef Stroganoff, Pickles Herrings, and the likes, while the craft beer menu ranges from Brown Ale, Czech Pilsener, India Pale Ale, to Hefewizen, Lager, and Witbier.
Viking reenactments perform on a stage at this location, and an AA of Hilda tucked in a chair, sectioned off from the guests near the stage, will talk every now and then, commenting on the skits on the stage, lampshading parts of the established universe, or getting angry. All of this is added to make the restaurant stand out more as it is the only Table Service restaurant in the entire land.
DIRK & DAPHNE'S DESSERTS
After the events of the three established films, Dirk, Daphne, and their kids have settled down and opened a bakery together as a family business of sorts. The quick service dining area can be found almost immediately upon entering the area, with it being the second building on the left. The quick service area takes the form of a medieval style bakery, with a seating area outside. Many of the food that can be brought in store are displayed around in certain parts of the interior along with the glass case at the register. Inside the bakery, you can eavesdrop on the chatter of the family as they make their craft. The restaurant primarily sells cookies, breadboxes, and pastries along with hot drinks.
The Garden Of Eden
The Garden Of Eden is reutilized from the second game with it fitting into the setting due to the connections between Islam and Medieval Europe. The Garden Of Eden can be found right around next to Hilda's Holstery similarly to how most medieval estates had gardens near them.
A large variety of flora is grown throughout this area, with a large variety of multiple specimens from different areas of the world. The paths around the area have Islamic Medieval Art patterns across them. The stand that sells the food consists of limestone square rooms, with faded colored archways covering the entryway. The stand sells various islamic dishes like Turkish style eggs, Rice pudding with dates, and Syrian bread. Seating arrangements are placed around the area for those who wish to eat around there.
The Armory
An medieval armory that's present in the village area of the land, with a matching interior displaying historical displays of armor sets, weapons, defense strategies, and torture devices. Of course, the interior of this medieval based armory is medieval based. This was the Armory where Dirk and many other knights have gotten their armor tailored from over the years. The shop also doubles as a museum as I stated above, with it going through the history of the warfare during medieval times, and showing the overall gritty nature of it all.
The store itself primarily sells clothing items within the store, along with merchandise surrounding the games. It's possible to also commission a custom made sword or shield from here as well, although it's a very expensive option.
Please do note that the museum sections and the sales sections of the store are properly seperate. All items seen are rented out from other museums, and then the displays are rotated for other, newer items.
The Treasury
As you may be wondering, you may be questioning why the loading room where Singe's skeleton room is was so barren. The Treasury is the explanation, as after Singe and Mordroc were slain, the castle had it's gold stripped from it and it was invested into the Treasury after Singe had been killed, and now it has been finally opened so all may have access to it. The store itself mainly functions as souvenir shop, selling merchandise from the games, and merchandise about the park.
The interior of the shop primarily is white, with birch wood floors. For aesthetic purposes, the check outs of the store are designed after bank teller lines, but medieval styled. Replicas of paintings, pottery, and gemstones are placed around in displays around the area, with the items supposed to have came from Singe's hoard.
The Bard's Stage
The stage for this particular show, the only one in the entire land, is fairly simplistic with it being simply a wooden stage with banners attatched to the back and with, of course, curtains and a backdrop in the back. Mostly everything in the land so far has been mostly focused on the first and second game, so how about we finally give the third game a chance?
The show itself is mostly a comedic retelling of the plot of Dragon's Lair 3, using a narrator character known as the bard. The show allows the cast member performers to make up their own interpretations and improvise, but there's a default script incase they can't think of anything. The show primarily uses poor prop/set design to set up gags or just lampshades the original.
Last edited:
Tux
Well-Known Member
The Time Warp

Queue

Inside of the flip side of the darker castle, is the lighter, more maintained castle that seems to have more signs of being inhibited, with torches being lit outside and recent looking banners being hung outside and with flowers growing outside. Inside the castle are long, winding, dimly lit stone halls with even more banners placed throughout. Eventually the halls lead to a throne room with long tables spanning across the room, and a king can be seen standing near it while music from the first and second game's soundtrack play. The king introduces himself as King Ethereld, and welcomes the guest to his kingdom. He figures he would want to make a good impression on everyone and decides to tell everyone the tale behind how his son in law saved his daughter and his kingdom a second time from Mordroc and his family. However, instead of telling us the tale, he decides to make us experience it ourselves, and invites us for a warp back in time into Dirk's perspective and head onto the loading station, which has been designed to look like a typical medieval home where the vehicles are to be boarded. The Time Warp is an interactive shooter dark ride that utilizes a combo of elements of Buzz Lightyear's Ranger Spin and Toy Story Mania.
Ride-Through
Once the ride vehicles are boarded, the ride vehicles then proceed to move into Dirk's House, and as Hilda moves into the scene via a door being busted down as Dirk and Daphne's AA children eat at the table. As the ride vehicles move throughout dioramic scene, the AA Hilda starts to yell at the audience, and using popouts, large objects with targets on them move into the area. As the ride vehicles manuever throughout the house, many of the items have targets on them. As the ride vehicles begin the moves out, the AA Hilda nearly gets in the way on the way out of the house, but after shooting her target for a bit, the vehicles are able to leave.
The ride vehicles then move throughout the forest, where many mythological yet dangerous creatures roam using a mix of screens and AAs, and as the ride vehicles swerve throughout, Dirk's absolutely terrifying mother-in-law pops out again for the brief time in AA form once again, before the ride vehicles speed into Mordroc's deserted castle, where the level also now has object based targets, and now the creatures are ghost related and themed, however Hilda does not show up for this level, and instead after a certain time interval, the ride vehicles then transition into a U shape around the time machine before a bright flash, and the ride vehicles move into the next scene.
During the next scene, the ride now is on a tropical island, with AA Popout creatceous dinosaurs attacking, who have targets on them as usual. Pterosaurs linger over from the ceiling, with the pterosaurs looming over with targets on their bellies using the effect from Dinosaur. As the ride vehicles rotate throughout a beach, a jungle, and a cave, the ride finally moves into a field where two batwinged centaurs appear on a screen carrying away Daphne while Mordroc taunts the riders while it starts to rain and flood the field, which is simulated with water spraying onto the riders and after a certain time interval of shooting, the ride moves onwards after a flash.
The ride then moves into an area primarily defined by it's contrasting color palette of nearly black color mixes and bright neon colors, and it's revealed that the area is taking place at the Mad Tea Party which Alice is attending, in which the targets are moved onto objects throughout the set, which proceeds to disrupt the party over time, in which the projection based AAs proceed to panic over time. After a certain time, the ride vehicles move up and rush past the overlooming Cheshire Cat, which is shot for a short period of time, before moving to the Queen Of Hearts' court where everyone in the room consists of animated popouts, and dialogue plays as the ride vehicles rotate until The Queen Of Hearts challenges the riders to a game of croquet with her and Alice. As the AAs stand and try to properly play the game, the targets are placed on parts of the croquet game, until after a certain time, the Jabberwocky in AA form pulls out over the Garden wall, and the ride leaves the scene and enters the next, and the ride lets out a flash.

The ride then moves into the set of the very bright and vibrant as the ride moves through a beautiful garden filled with a large variety of exotic plants and animals living together in harmony as guardian angels appear and try to attack the riders, however due to them having targets on them, they can be shot, however as the ride rotates throughout, Eve appears and starts to flirt with the riders, and we start to swerve away from her advances while shooting at the guardian angels. Eventually, we back into a corner filled with flower bushes, and we are cornered by the two screen-based snakes, with one trying to eat the riders and the other trying to manipulate the riders. The riders then shoot at them in an attempt to fight them off, and then swerve deeper into the tangle of the gardens until the ride moves into a scene of a popout Eve eating the apple with the snakes watching, but the ride flashes, and the ride swerves into the next scenes.
The ride then moves into a giant sized replica of Beethoven's study, with most of it being achieved with large structures or through screen technology which all have targets hidden carefully throughout the room as not to disrupt the environment while still providing hit points, as Beethoven starts to play music which causes the ride vehicles to shake and vibrate, and while we try to make it to a seeming exit, Beethoven's cat then appears, which is a just a huge popout figure, who has a target on themself. As the ride vehicles then move through parts of his house, we encounter the cat over and over again, until the ride goes into the next part through a mouse hole, and as the light fades in a more tame manner compared to the rest of the attraction and the hisses of the cat can be heard while moving out.
The ride then moves into an ancient egyptian crypt, where we shamble about the cobwebs and the halls for a bit, shooting at relics, carvings, and tombs, until we move into a rather large one. The ride vehicles move into a rather large tomb after it's door automatically shifts open, and in it we see a shambling mummy that appears to be Daphne on a screen, and the ride vehicles move as target appear to show that the riders should shoot. However, after a certain time, the bandages drop off to reveal Mordroc, who proceeds to taunt the riders. Fake lightning is projected on the walls of the room before the ride vehicles speed out of the area, where giant spider AAs appear and hiss while looming from their webs, hanging AA Bats open up their wings back and forth to reveal targets on their bellies, and giant bats hang from the ceiling and swoop down similarly to the pterosaurs. Occassionally, a ride vehicle will attempt to go down a wrong corridor and it'll spray the guests with water to simulate the corrosive poison from the game. Scarab projections start to crawl on the wall, all of which can be shot off, and before the ride vehicles exit, they stop to allow the riders to shoot a giant mummy popout figure before speeding off with a flash.

The ride vehicles move back into the castle, stop in front of a screen for the cutscene where Mordroc puts the Death ring on Daphne's fingerx and she transforms into a banshee. The ride vehicles then move throughout a replica of the castle set, but this time with the creatures are AAs of Daphne who lunges out to attack the guests, as the guests move throughout ballrooms, stables, and narrow corridors. After a while, the ride vehicles come face to face with Banshee Daphne and Mordroc in the same room and ingage in a boss fight using screens and after a few minutes of shooting, the ring will fall off Daphne, and destroy Mordroc in the process. However, if the riders don't shoot at all, Daphne will accidentally throw it off herself instead while trying to attack. After this happens, the ride vehicles head out of the room to meet up with the AA Daphne, who has been returned to normal and lovingly thanks you. However, suddenly the ride vehicles head through a door, where an AA of a scottish snake shouts at you, declares revenge on you, and curses your family as the ride vehicles then head in opposite direction of the first scene as a combination of all previous enemies try to attack you, until the ride vehicles return back to the house with the AA Daphne inside, and head to unloading station.
Queue
Inside of the flip side of the darker castle, is the lighter, more maintained castle that seems to have more signs of being inhibited, with torches being lit outside and recent looking banners being hung outside and with flowers growing outside. Inside the castle are long, winding, dimly lit stone halls with even more banners placed throughout. Eventually the halls lead to a throne room with long tables spanning across the room, and a king can be seen standing near it while music from the first and second game's soundtrack play. The king introduces himself as King Ethereld, and welcomes the guest to his kingdom. He figures he would want to make a good impression on everyone and decides to tell everyone the tale behind how his son in law saved his daughter and his kingdom a second time from Mordroc and his family. However, instead of telling us the tale, he decides to make us experience it ourselves, and invites us for a warp back in time into Dirk's perspective and head onto the loading station, which has been designed to look like a typical medieval home where the vehicles are to be boarded. The Time Warp is an interactive shooter dark ride that utilizes a combo of elements of Buzz Lightyear's Ranger Spin and Toy Story Mania.
Ride-Through
Once the ride vehicles are boarded, the ride vehicles then proceed to move into Dirk's House, and as Hilda moves into the scene via a door being busted down as Dirk and Daphne's AA children eat at the table. As the ride vehicles move throughout dioramic scene, the AA Hilda starts to yell at the audience, and using popouts, large objects with targets on them move into the area. As the ride vehicles manuever throughout the house, many of the items have targets on them. As the ride vehicles begin the moves out, the AA Hilda nearly gets in the way on the way out of the house, but after shooting her target for a bit, the vehicles are able to leave.
The ride vehicles then move throughout the forest, where many mythological yet dangerous creatures roam using a mix of screens and AAs, and as the ride vehicles swerve throughout, Dirk's absolutely terrifying mother-in-law pops out again for the brief time in AA form once again, before the ride vehicles speed into Mordroc's deserted castle, where the level also now has object based targets, and now the creatures are ghost related and themed, however Hilda does not show up for this level, and instead after a certain time interval, the ride vehicles then transition into a U shape around the time machine before a bright flash, and the ride vehicles move into the next scene.
During the next scene, the ride now is on a tropical island, with AA Popout creatceous dinosaurs attacking, who have targets on them as usual. Pterosaurs linger over from the ceiling, with the pterosaurs looming over with targets on their bellies using the effect from Dinosaur. As the ride vehicles rotate throughout a beach, a jungle, and a cave, the ride finally moves into a field where two batwinged centaurs appear on a screen carrying away Daphne while Mordroc taunts the riders while it starts to rain and flood the field, which is simulated with water spraying onto the riders and after a certain time interval of shooting, the ride moves onwards after a flash.
The ride then moves into an area primarily defined by it's contrasting color palette of nearly black color mixes and bright neon colors, and it's revealed that the area is taking place at the Mad Tea Party which Alice is attending, in which the targets are moved onto objects throughout the set, which proceeds to disrupt the party over time, in which the projection based AAs proceed to panic over time. After a certain time, the ride vehicles move up and rush past the overlooming Cheshire Cat, which is shot for a short period of time, before moving to the Queen Of Hearts' court where everyone in the room consists of animated popouts, and dialogue plays as the ride vehicles rotate until The Queen Of Hearts challenges the riders to a game of croquet with her and Alice. As the AAs stand and try to properly play the game, the targets are placed on parts of the croquet game, until after a certain time, the Jabberwocky in AA form pulls out over the Garden wall, and the ride leaves the scene and enters the next, and the ride lets out a flash.
The ride then moves into the set of the very bright and vibrant as the ride moves through a beautiful garden filled with a large variety of exotic plants and animals living together in harmony as guardian angels appear and try to attack the riders, however due to them having targets on them, they can be shot, however as the ride rotates throughout, Eve appears and starts to flirt with the riders, and we start to swerve away from her advances while shooting at the guardian angels. Eventually, we back into a corner filled with flower bushes, and we are cornered by the two screen-based snakes, with one trying to eat the riders and the other trying to manipulate the riders. The riders then shoot at them in an attempt to fight them off, and then swerve deeper into the tangle of the gardens until the ride moves into a scene of a popout Eve eating the apple with the snakes watching, but the ride flashes, and the ride swerves into the next scenes.
The ride then moves into a giant sized replica of Beethoven's study, with most of it being achieved with large structures or through screen technology which all have targets hidden carefully throughout the room as not to disrupt the environment while still providing hit points, as Beethoven starts to play music which causes the ride vehicles to shake and vibrate, and while we try to make it to a seeming exit, Beethoven's cat then appears, which is a just a huge popout figure, who has a target on themself. As the ride vehicles then move through parts of his house, we encounter the cat over and over again, until the ride goes into the next part through a mouse hole, and as the light fades in a more tame manner compared to the rest of the attraction and the hisses of the cat can be heard while moving out.
The ride then moves into an ancient egyptian crypt, where we shamble about the cobwebs and the halls for a bit, shooting at relics, carvings, and tombs, until we move into a rather large one. The ride vehicles move into a rather large tomb after it's door automatically shifts open, and in it we see a shambling mummy that appears to be Daphne on a screen, and the ride vehicles move as target appear to show that the riders should shoot. However, after a certain time, the bandages drop off to reveal Mordroc, who proceeds to taunt the riders. Fake lightning is projected on the walls of the room before the ride vehicles speed out of the area, where giant spider AAs appear and hiss while looming from their webs, hanging AA Bats open up their wings back and forth to reveal targets on their bellies, and giant bats hang from the ceiling and swoop down similarly to the pterosaurs. Occassionally, a ride vehicle will attempt to go down a wrong corridor and it'll spray the guests with water to simulate the corrosive poison from the game. Scarab projections start to crawl on the wall, all of which can be shot off, and before the ride vehicles exit, they stop to allow the riders to shoot a giant mummy popout figure before speeding off with a flash.
The ride vehicles move back into the castle, stop in front of a screen for the cutscene where Mordroc puts the Death ring on Daphne's fingerx and she transforms into a banshee. The ride vehicles then move throughout a replica of the castle set, but this time with the creatures are AAs of Daphne who lunges out to attack the guests, as the guests move throughout ballrooms, stables, and narrow corridors. After a while, the ride vehicles come face to face with Banshee Daphne and Mordroc in the same room and ingage in a boss fight using screens and after a few minutes of shooting, the ring will fall off Daphne, and destroy Mordroc in the process. However, if the riders don't shoot at all, Daphne will accidentally throw it off herself instead while trying to attack. After this happens, the ride vehicles head out of the room to meet up with the AA Daphne, who has been returned to normal and lovingly thanks you. However, suddenly the ride vehicles head through a door, where an AA of a scottish snake shouts at you, declares revenge on you, and curses your family as the ride vehicles then head in opposite direction of the first scene as a combination of all previous enemies try to attack you, until the ride vehicles return back to the house with the AA Daphne inside, and head to unloading station.
Last edited:
Register on WDWMAGIC. This sidebar will go away, and you'll see fewer ads.