Disney Sewing Projects!

sweetpee_1993

Well-Known Member
Original Poster
I figured sewing projects could use their own thread! Let's see what others are sewing!


Here's my latest that I made yesterday. A friend asked for overalls to fit one of her dolls (she's a fellow collector) in a Disney Cuties fabric. No problemo!

60ef1b2d.jpg


This is to fit a cloth-body doll that's about 17" tall and 15" around her torso.

More to come....:wave:
 

sweetpee_1993

Well-Known Member
Original Poster
I've been meaning to take pics to post of these little cross body bags I made for myself for our kidless trip in May of '08. I designed them to be small, lightweight, and carry only the bare essentials. Inside I made 2 little pockets that are the perfect size to hold a Key to the World card and an ID (for beverage purposes). The bags are about 8" wide. They're just big enough to carry the bare essentials for a girl (id, room key, lip gloss, powder, comb, cell phone, and a change pouch). I gave them a simple velcro closure so access is super-duper easy when going thru bag check.

My favorite of the 2 is the pastel pactchwork one. I found that fabric as a remnant probably 12 years ago and have saved it for all these years for something really cool. I sewed the 3 wooden buttons on in a classic icon with different pastel threads for each. This thing is sweet but subtle. Love it!


photo-2.jpg


photo-3.jpg


photo-4.jpg


And to really give an idea of scale, here's me wearing the bag at the conclusion of our Keys to the Kingdom tour, circa May '08:

100_1303.jpg


***edit***....um....hubby noticed just now when I showed him this pic so I thought I'd just sorta mention it for clarification in case any of y'all who've seen pics of me from my trip reports and notice a couple things..uh..missing......yes, this was before my girls came into my life......
 

HollyBelle

Well-Known Member
***edit***....um....hubby noticed just now when I showed him this pic so I thought I'd just sorta mention it for clarification in case any of y'all who've seen pics of me from my trip reports and notice a couple things..uh..missing......yes, this was before my girls came into my life......

:ROFLOL::ROFLOL::ROFLOL:

I totally didn’t notice at first and of course I had to scroll back up after reading! Yay for you. :D I always appreciate your candor, Kelly.

Now back on track… I love that you put the effort into making the interior of the bags just as cute as the outside. LOVE.
 

sweetpee_1993

Well-Known Member
Original Poster
^^^^
Here's a good laugh for you: I had to 'splain to Tracey what "candor" means. :ROFLOL: I did actually give thought to adding the edit. Wasn't sure if I should. Ya know, at what point does TMI just scare people off??? I'm such an open-book person. My 1st trip report was my first trip with the girls. Even my brother joked with me at some point during the trip, "Oh yeah! This is their first trip here with you!" I wanted a button. I always have fun crackin' jokes about 'em...and about myself. It's just too obvious not to have fun with it. :lol:

As for the bags, I love happy colors & unexpected or hidden details. I love love love the bags but think I'd like 'em better if they were a little bigger. Golly, I wish I had more time before this next trip. I've got 3 other sewing projects that I have to finish up before we leave PLUS getting everything/everyone ready to go! :eek:
 

Tiggerish

Resident Redhead
Premium Member
Everything is adorable! I envy you that you have time (or should I say, that you MAKE time) to sew. I used to, and was decent at it, but quit before I got really good.

I have to echo Holly in saying how great it is that you made the inside of your bag as cute as the outside (and your comment on the picture of yourself is just a hoot!)

It's getting to be time to pack, isn't it?!! :eek:
 

sweetpee_1993

Well-Known Member
Original Poster
Everything is adorable! I envy you that you have time (or should I say, that you MAKE time) to sew. I used to, and was decent at it, but quit before I got really good.

I have to echo Holly in saying how great it is that you made the inside of your bag as cute as the outside (and your comment on the picture of yourself is just a hoot!)

It's getting to be time to pack, isn't it?!! :eek:

Thank you! I wish I could make more time for sewing, too. Generally, the sewing is sorta like the TR's. If I'm getting stuff done and completed it means I've let the world around me go and tuned it all out to focus my brain on my task.

Yep. i *should* be packing...but I'm working on giving the house the good cleaning it needs, gotta wash the car, still have Grammar & Science lesson plans to write for the youngest, hubby needs prescriptions filled, gotta get the dog's official shot-record filled in by the vet for the kennel, need to assemble all the travel info into 'the book', bills gotta get paid, oldest has ortho appointment, I have hair appointment, really need to squeeze a mani/pedi in somewhere, trying to get by the tanning bed because like a former co-worker once said: "Even fat looks better tanned", dog has to go to the groomer...all in addition to the usual daily cooking/cleaning/laundry/teacher/mother/referree gig....but I'm gonna get the suitcases out at some point. I hope. I dunno. After looking at that list I think I might just throw my stuff in the car and run away from home. :lol:

I had grand plans to make myself a dress to wear to our YC dinner....:lol:.....yeah...that happened. I bought the coolest vintage pattern and adorable Bambi toile fabric.

I still owe a friend a complete ensemble for one of her little bears. I hoped to finish that before the trip. Nope. I also had hoped to whip out a couple outfits to fit Duffy before I have to leave. Not a prayer of that happening now.

I did manage to make our little schnauzer a snuggle sack a few weeks ago to see how she'd do with it. I'm so worried she'll get cold at night at the kennel while we're on vacation. She normally sleeps under a blanket against me and we keep each other toasty. She loves her snuggle sack. I may need to stay up after the family goes to bed tomorrow night to make her one more right quick. That way when we go to visit her at the Best Friends we can swap out her sack for a clean one & rotate. People think I'm insane because I keep our little dog as clean as I did our children when they were little guys. This includes her dishes, blankets, beds, toys, etc. :lol:

Oh! And my two newest Disney fabrics arrived from China yesterday. Absolutely killer stuff! I'm cookin' up plans for 2-3 more rag quilts to sell this time around. Of course, I won't be able to start any cutting until after Thanksgiving....

And finally, as if I wasn't stressing enough over my laundry list of 'To-Dos'...I suppose I should've already been Christmas shopping, huh? :brick:

I need a vacation.
:wave:
 

mrtoad

Well-Known Member
Where do you buy your fabrics from? We would like to make a quilt for our youngest daughter. She right now has comforter that is a cheapo that we would like to replace but don't like anything in the stores. Thx!
 

sweetpee_1993

Well-Known Member
Original Poster
Well, I need to generate extra $$ in the months to come. I'm seriously planning some projects and things that I can do then create a store front on Etsy. I'll let y'all know when I do. :wave: All proceeds will fun the next adventure(s). :sohappy:
 

disneyrcks

Well-Known Member
Hey! I know I am bumping a thread (hope no one minds) but I just started quilting and your work is so beautiful. I was just wondering what kind of sewing machine you use? I have been looking at some but there are so many different brands and types, also they can be quite expensive.
 

sweetpee_1993

Well-Known Member
Original Poster
Hey! I know I am bumping a thread (hope no one minds) but I just started quilting and your work is so beautiful. I was just wondering what kind of sewing machine you use? I have been looking at some but there are so many different brands and types, also they can be quite expensive.

Thank you! In early 2008 I splurged & bought myself my first nice, new sewing machine. Until then I borrowed my mother-in-law's machine and/or her serger. I went to a local shop and spent time looking at the machines, watched the lady demo various features, and pondered what my use would be. I ended up going with a more entry-level Brother Innov-Is 40 / Project Runway Edition. I want to say I paid around $400 but it's one of the the best $400 I've spent. It self-threads, has the horizontal drop-in bobbin, electronic controls, like 50 different stitches including some basic embroidery stitches, and even does an overcast to finish my seams like a pro without using a separate serger machine. I don't know if you've ever used a serger but they use 5+ threads. To thread the machine is long & involved. There's an optional foot I could purchase that will trim the fabric as its fed into my machine to overcast making my little old Brother do the same thing expensive sergers do. My favorite feature is being able to sew without using a foot pedal! It has the push-button needle controls and sliding speed controls. I also opted to go with a Brother vs. Viking, Husquevarna, or Janome because the Brother is an American thing and would likely be easier to have serviced or repairs. I spent extra to go with a performance Brother over Singer because the gearing and internal parts are metal vs. plastic. Just like with stand mixers, you get what you pay for. Buy a Kitchenaid once or other brands every few years. Ya know? I've had fantastic performance from my machine and highly recommend the Brothers.

A year or so ago DH was looking to upgrade me to an embroidery machine with a lot more functions and things but I just don't think I'm ready for all that. It's a whole other technology to learn and skill to hone. I'm thinking I'll continue to refine my skills and finishing work with what I have and maybe make that big (financial) jump down the road.

I'm glad you said something on here! I revisited the thread not long ago and am currently creating/constructing a custom backpack of sorts for myself. It's really amazing and I'm so proud of it! I can't wait to have it done so I can share here!
 
Very cool sweetpee!
Like the inner stitching too.
I see a distributing line and collection being sold on Canal Street. ;)
But seriously nice job and defiantly worth the time and effort. :D
 

disneyrcks

Well-Known Member
I'm glad you said something on here! I revisited the thread not long ago and am currently creating/constructing a custom backpack of sorts for myself. It's really amazing and I'm so proud of it! I can't wait to have it done so I can share here!

Thanks for all the info! I can't wait to see your backpack!
 

sweetpee_1993

Well-Known Member
Original Poster
Can you believe I only have 2 stinkin' buttons left to sew on the backpack but I've let it sit in lieu of another project??? Yeah, story of my life: incomplete projects!

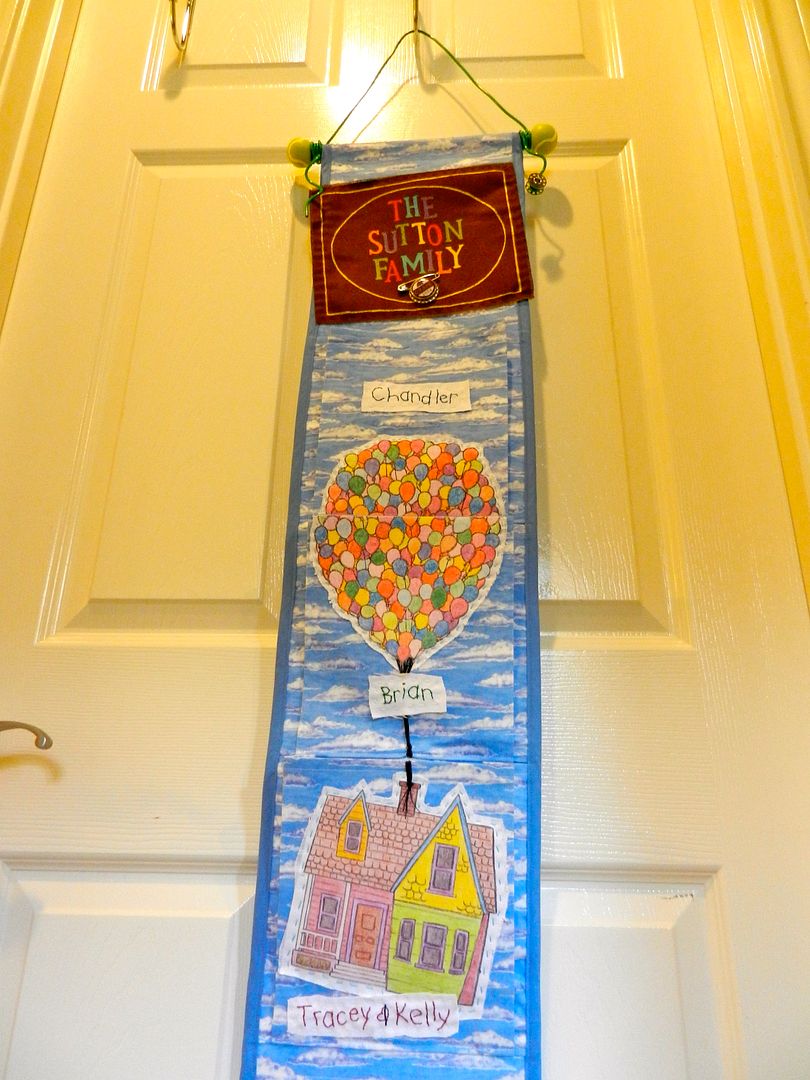
So here's the latest-n-greatest. Those who don't know what a "Fish Extender/FE" is here's a brief explanation: On the Disney Cruise Line classic ships there's a metal clippy thing outside every stateroom for schedules, correspondence, etc. to be clipped to every day. The metal clip looks like a decorative fish. People who will be sailing together meet up online and form little cruise groups. They often will make hanging pocket organizers to hang from the fish clip then leave each other little surprise trinkets and presents throughout the cruise. The hanging pocket organizers are called "Fish Extenders" or "FE" for short because they hang from the fish and extend it's use per se. Last week I made a Fish Extender for us for the first time. I wanted to do something completely different and inspired. I posted this on the other forum where the cruise groups are super-active and form up. I thought I'd share it here as well. Here's a copy/paste for you to enjoy:


BACK STORY

Our first FE from our first cruise this past September I ordered from Etsy (I think stitchesnbows/stephanie???). We never intended to reuse our first one because I sorta knew if we continued cruising I'd probably make more. So our first FE said "The Sutton's First Cruise". Yep, not using that again. I don't have one of the super-cool embroidery machines so I can't do all the cool Disney font stuff or the fun embroidered appliques/graphics. Because of that, I knew I didn't want to make an FE that was remotely based on those beautiful designs. It would turn out looking like I tried to produce the same FE without the right tools. I understood that. So I knew from the start I had to come up with a theme or a design that I could really work for a lot of detail and utilize different techniques. And then my inspiration hit me. Pixar Up! One of our favorite Disney/Pixar movies.

The design elements evolved as my material arrived and I started working. I'll explain more as I go thru the details below.

So, I proudly present to you my completely from-my-brain (no laughing) Pixar Up! inspired FE!!!

file-5.jpg


file.jpg


THE DETAILS

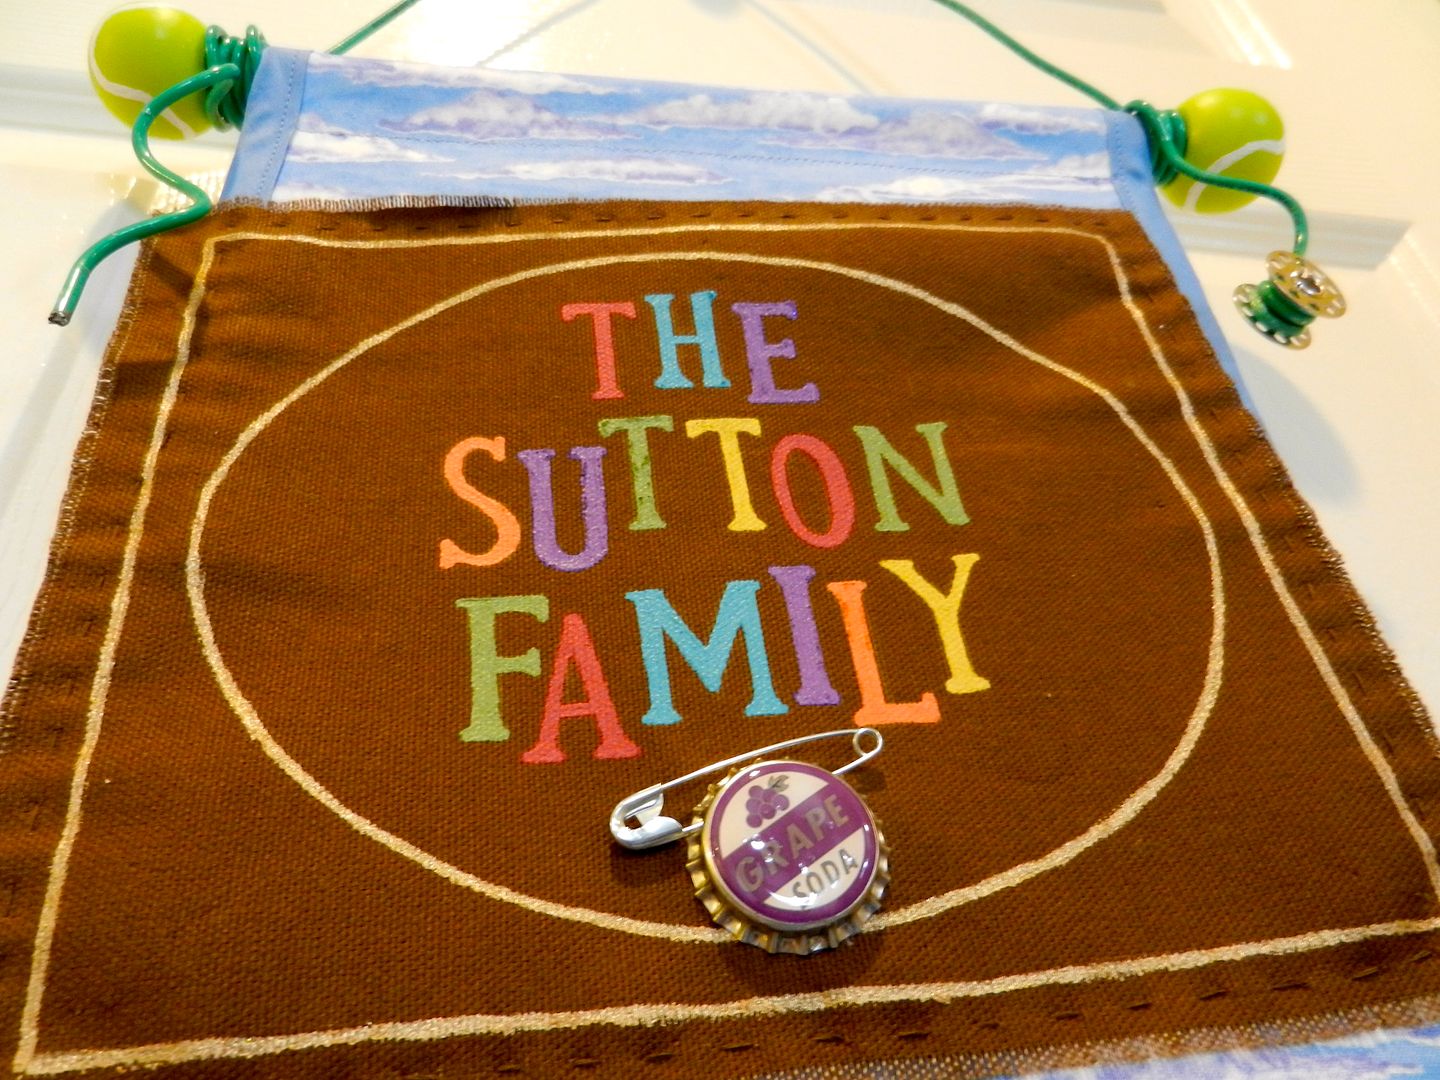
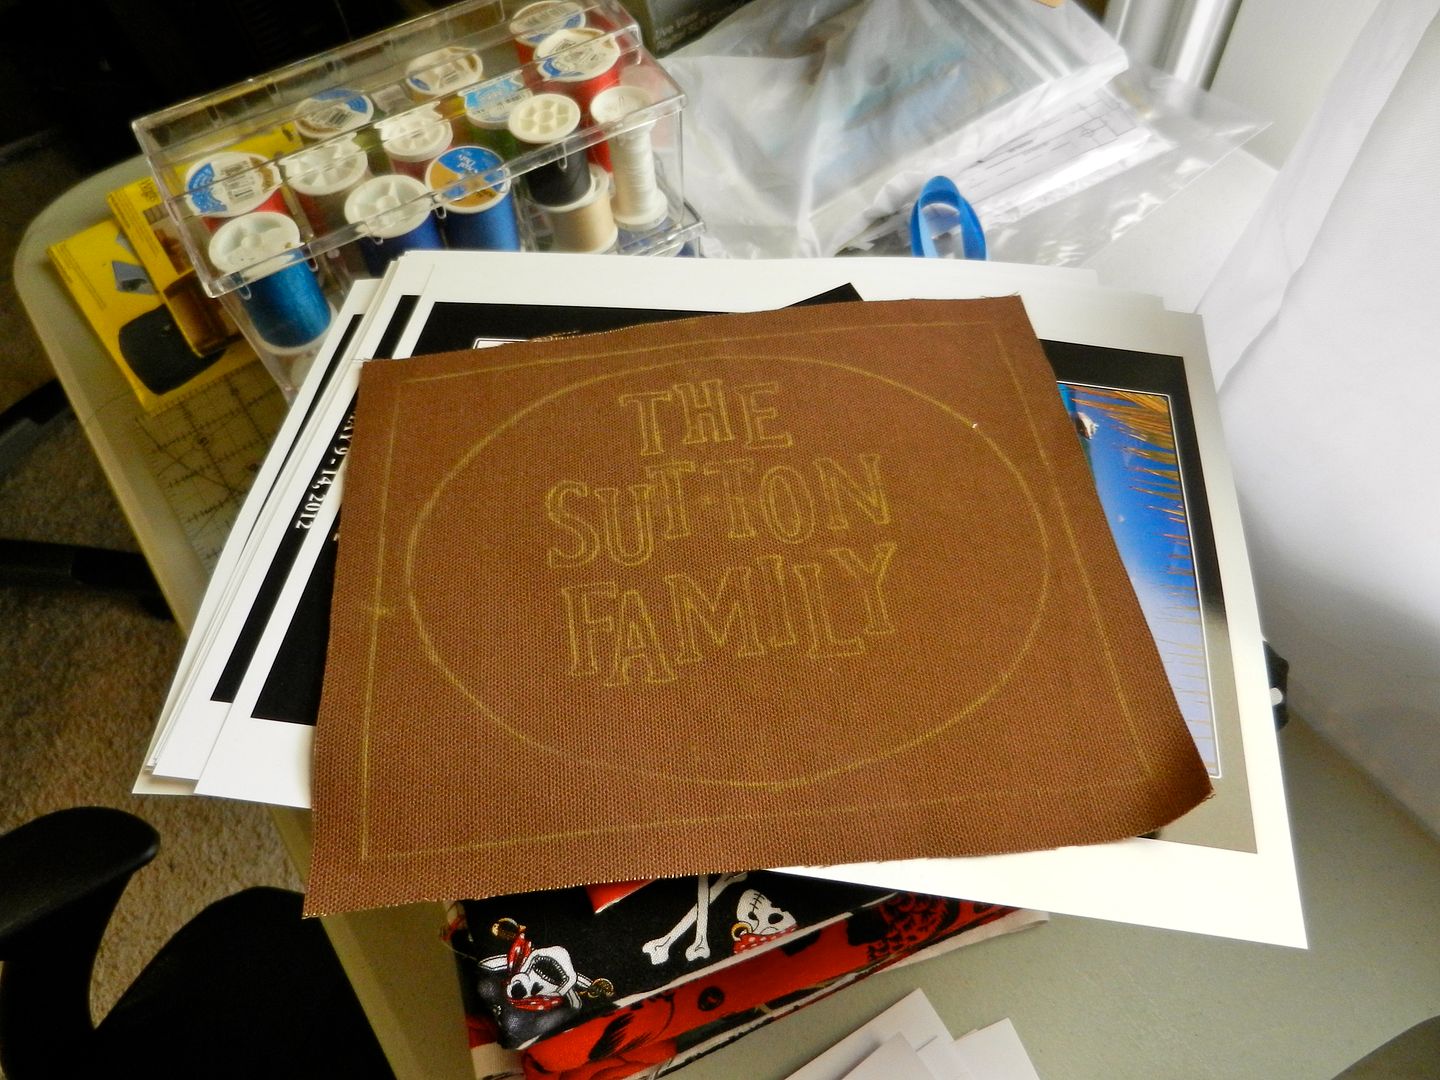
The "cover" or as I seemed to dub it, The Name Plate (& hanging assembly). Like I said, I don't have a fancy embroidery machine. I have a nice sewing machine that I adore with my whole heart. ((I used hand-me-downs and borrowed for 15 years before I bought my very own.)) I have always had an artistic streak, an innate ability to find scale, sketch, paint, create, etc. If I couldn't embroider I had to rely on what I could do. I bought 1/2 yard of brown upholstery-weight fabric. I cut it to the dimensions I needed per my initial sketches of of my FE and ironed a chunk of interfacing to the back leaving 1/2 inch raw all the way around the edges. This was to stabilize the fabric (no more stretching or shifting) and give a more solid backing for the paint that was to come. I actually cut & prepped 2 of the name plates in case I didn't like the 1st one. I spent about an hour working out how to get my lettering the way I wanted it, make an elipse template, then do the actual to-scale sketch. I had some yellow transfer sheets (they sell these for quilting, I think) and simply traced the design onto the fabric. It looked like this:
DSCN0059.jpg


Then I gathered up all the fabric paints I had, a few fine-tip paint brushes, mixed the colors to what I needed them to be, and painted away. There are 4 coats on each letter.

file-4.jpg


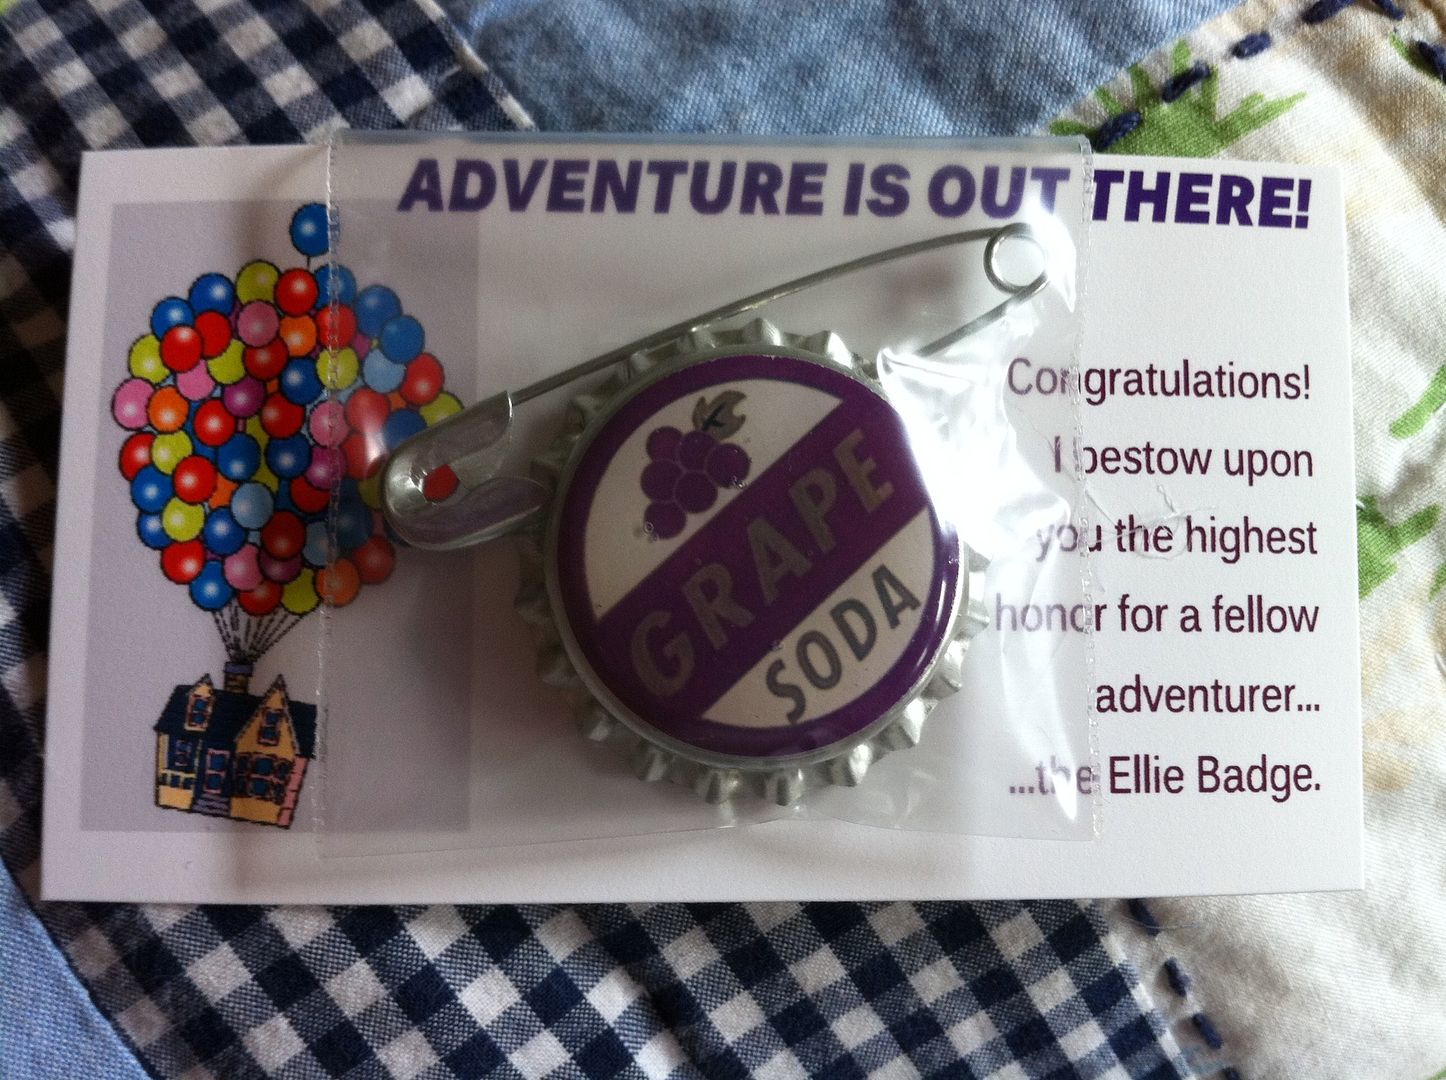
I know Ellie's adventure book has a little applique globe thing under the lettering and that was something I really struggled with. Initally I was going to find a graphic online that would work, size it to what I needed, print it on an iron-on transfer, then tranfer it to a little piece of fabric to stitch on. While I was sketching the name plate I needed a circle to give me a representation of the globe. I was digging around my craft stuff for anything the right size I could trace in it's place when I came across the extra leftover Ellie badges I made for one of my FE gifts last September. Those looked like this:

91627.jpg


Well, the Ellie badge was exactly the right size to fit the space I had to fill on my name plate and it was one of those **duh!** moments. An Ellie Badge it would be!

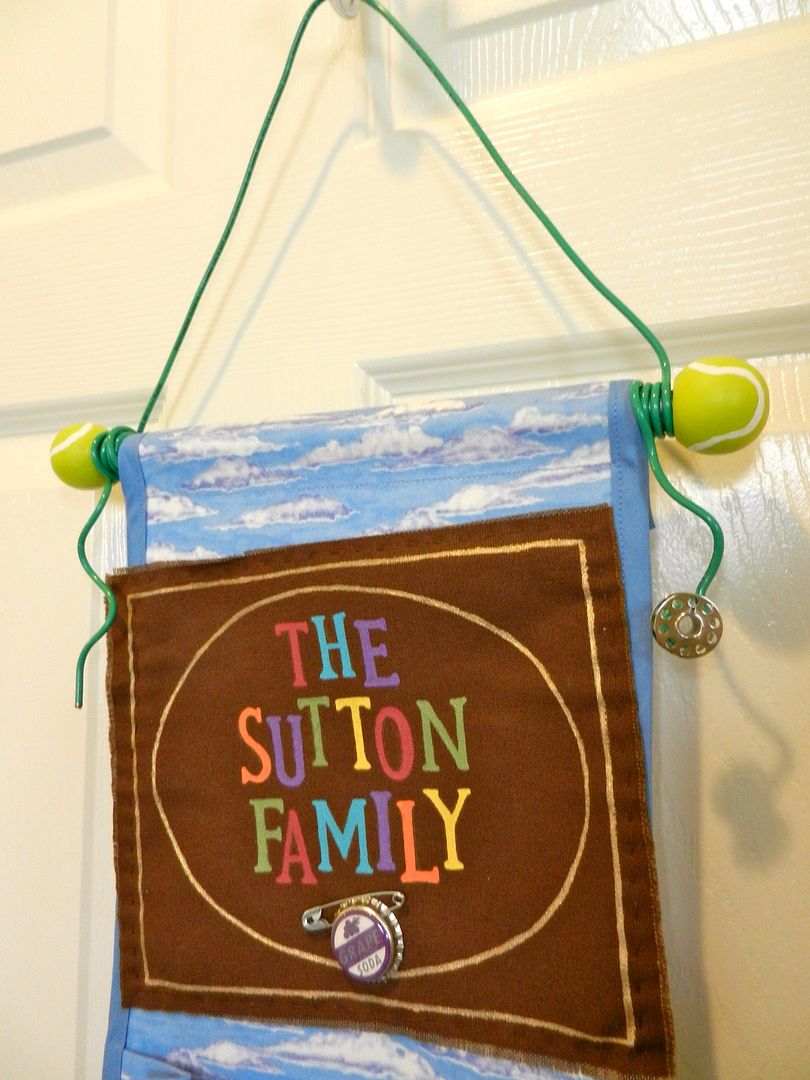
When thinking of the hanging apparatus for the FE (this all actually came to mind when the whole thing was near completion) it wasn't hard to be hit by some fun details I could include. The dowel rod that you can't see is actually painted silver like Carl's cane. The tennis ball ends are wooden balls I got at Hobby Lobby then hand-painted. My poor little dog sat at my feet patiently waiting for me to give her back the tennis ball I borrowed to see the scale. LOL! Then there was the thought that the string that the FE hangs from should be a representation of the hose Carl tows his house around with. Miniature green hose is not easy to come up with. We ended up at Lowe's having the ever-patient employee roll the dozens of spools of wiring around to us for closer inspection over and over until we analyzed everything green and made our best selection. 6 feet of green wiring was purchased because I had no idea how much I'd need. I didn't end up using that much. Maybe 4 feet or so. So I have the hose but how do you make it look more like what it's supposed to be? I need a hose reel. Again, not something you readily find a miniature version of. I used a metal sewing machine bobbin. Yep, had to buy that package special for this project. My machine only uses plastic drop-ins. It's hard to tell but I did barely dip the opposite tail end of the "hose" in silver model paint for the hose tip.
file-1.jpg


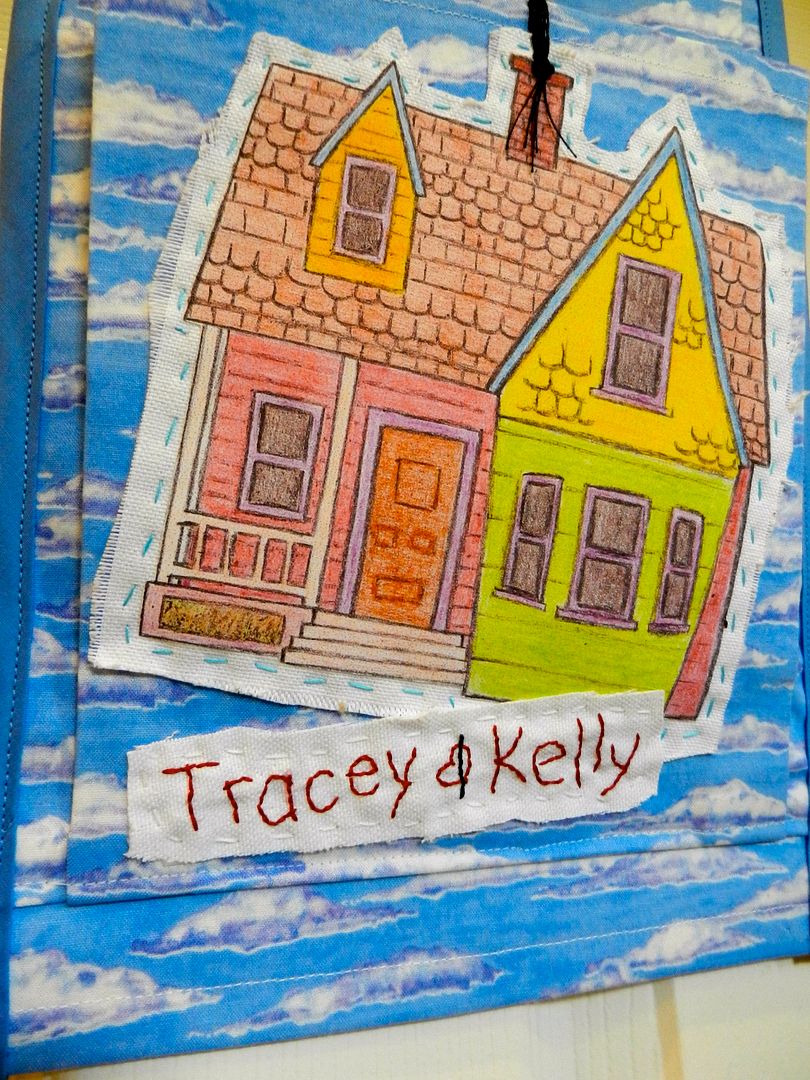
Carl & Ellie's house was actually the very first thing I sketched for this FE. I printed a few screen shots off the computer to use for scale & color reference then completely free-hand sketched the house. I copied my sketch, resized it for my needs, then dug out my crayons (yes, I have my own crayons and coloring books that are MINE). I colored the house and outlined it. Then I did a high-res scan to capture the texture of the crayon. I played with the color levels a bit in the computer until I got it how I wanted it. Then, I printed the house onto a fabric inkjet printer sheet that had an iron-on backing (I did NOT know these existed until a week ago). Fabulous. I cut the house out all the way to the crayon line edges, pressed the picture onto a white upholstery-grade fabric, then cut out around it leaving a void to hand-stitch the house onto the FE later in the process. I stitched the balloon and house appliques on after all the pockets were attached by their bottom seams to the FE backing but not before the sides were attached. This made it possible for me to lay out the pieces where I wanted the to be (in relation to the pockets & other elements) and still maneuver my hands to hand-stitch. I deliberately used a contrasting thread and scattered, uneven stitch pattern because the FE needed to look like a little girl made it. It's a very intentional part of the theme.
file-3.jpg


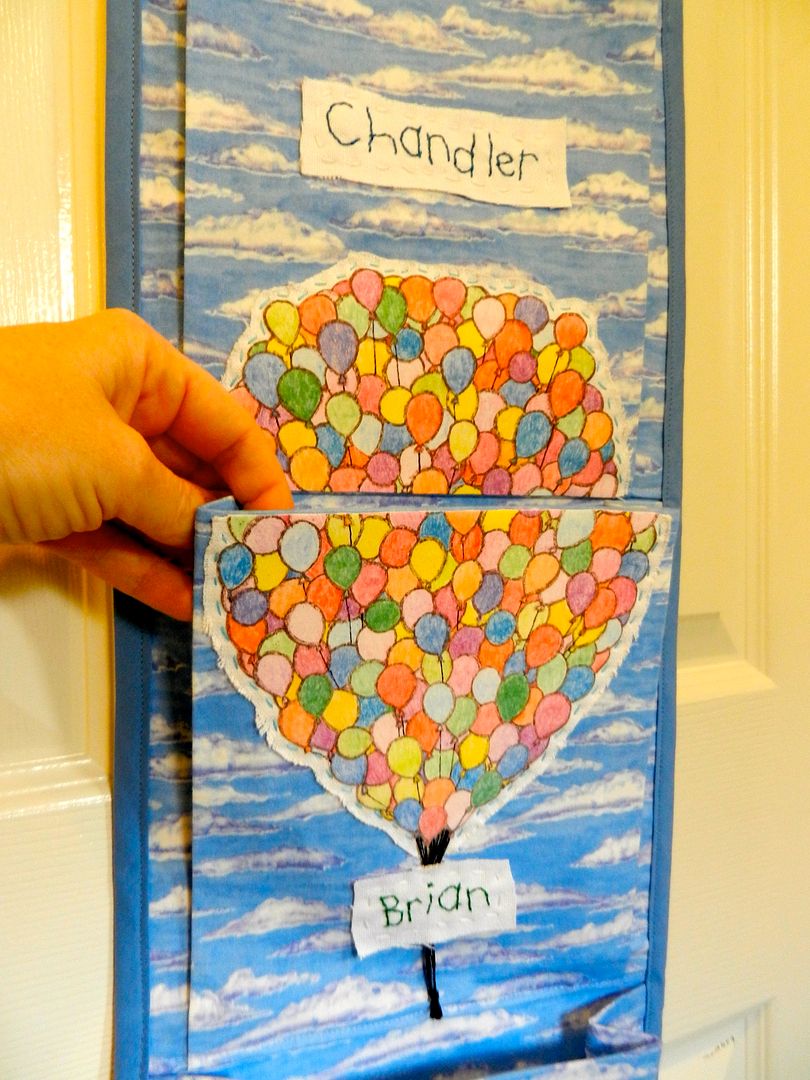
Then there's the balloons. I thought the balloons were going to kill me. Originally I purchased a small remnant piece of fabric off eBay that had a graphic of balloons floating in the air. I was going to use this piece of fabric to make the top pocket out of thus representing the balloons that carry the house. When the fabric piece arrived I was in for a heckuva kink. The orientation of the balloon fabric was wrong. It was a rectangular piece. Instead of the balloons floating up, they would've been floating sideways. This forced me to make the balloons the way I should've done them from the start. Same way as the house. No shortcuts. Sketch, copy, resize, color, scan, print, press, and....oops....the balloons are not going to fit on just 1 pocket. Dangit! Time to improvise. I cut the balloon piece in half (I felt sick when doing it, actually). The balloons are stitched where you see stitching and then liquid stitch lines the cut edges all the way across. None of it was a fast process. It took a long time and the balloons were extremely tedious. Also, after attaching the balloons my oldest son commented that they needed some string. Oh yeah. So on the balloon pieces themselves, the little lines are drawn in with a fine-tip Sharpie. I initially drew the lines in from the chimney up to the balloons but didn't like how cheesy it looked. So I dug out some charcoal-colored upholstery thread and drove myself nuts for a few hours with actual strings. The stings are probably the element I'm least happy with in the end. I think I could've done better but by that time I was thoroughly irked with them and was tired of fooling with it. I'm not about to redo them either. So the strings are what they are. The world can just deal with it. LOL!
file-2.jpg


The names on the pockets were another part I thought about a lot. I knew I couldn't stitch or paint them right onto the cloud fabric because they'd be lost. And look half-done. What would a little girl do? Well, she'd probably lovingly spell out the names best she could with regular thread making sure her favorite boys each had their names in their favorite color. Again, deliberate randomness in the stitching and the lettering to express the theme. The name pieces were stitched on at the same time as the other elements.

The FE construction itself was easy-peasy. I could do that in my sleep. I did stabilize my fabric by fusing it to other fabric. The FE back is fused to the same white upholstery fabric as the applique elements. The pocket faces are fused to simple white sheeting. Also, to protect the backside of the stitching that holds all the little appliques on I ironed lightweight bits of fusible interfacing over the thread to add extra protection from objects going in and coming out of the pockets.

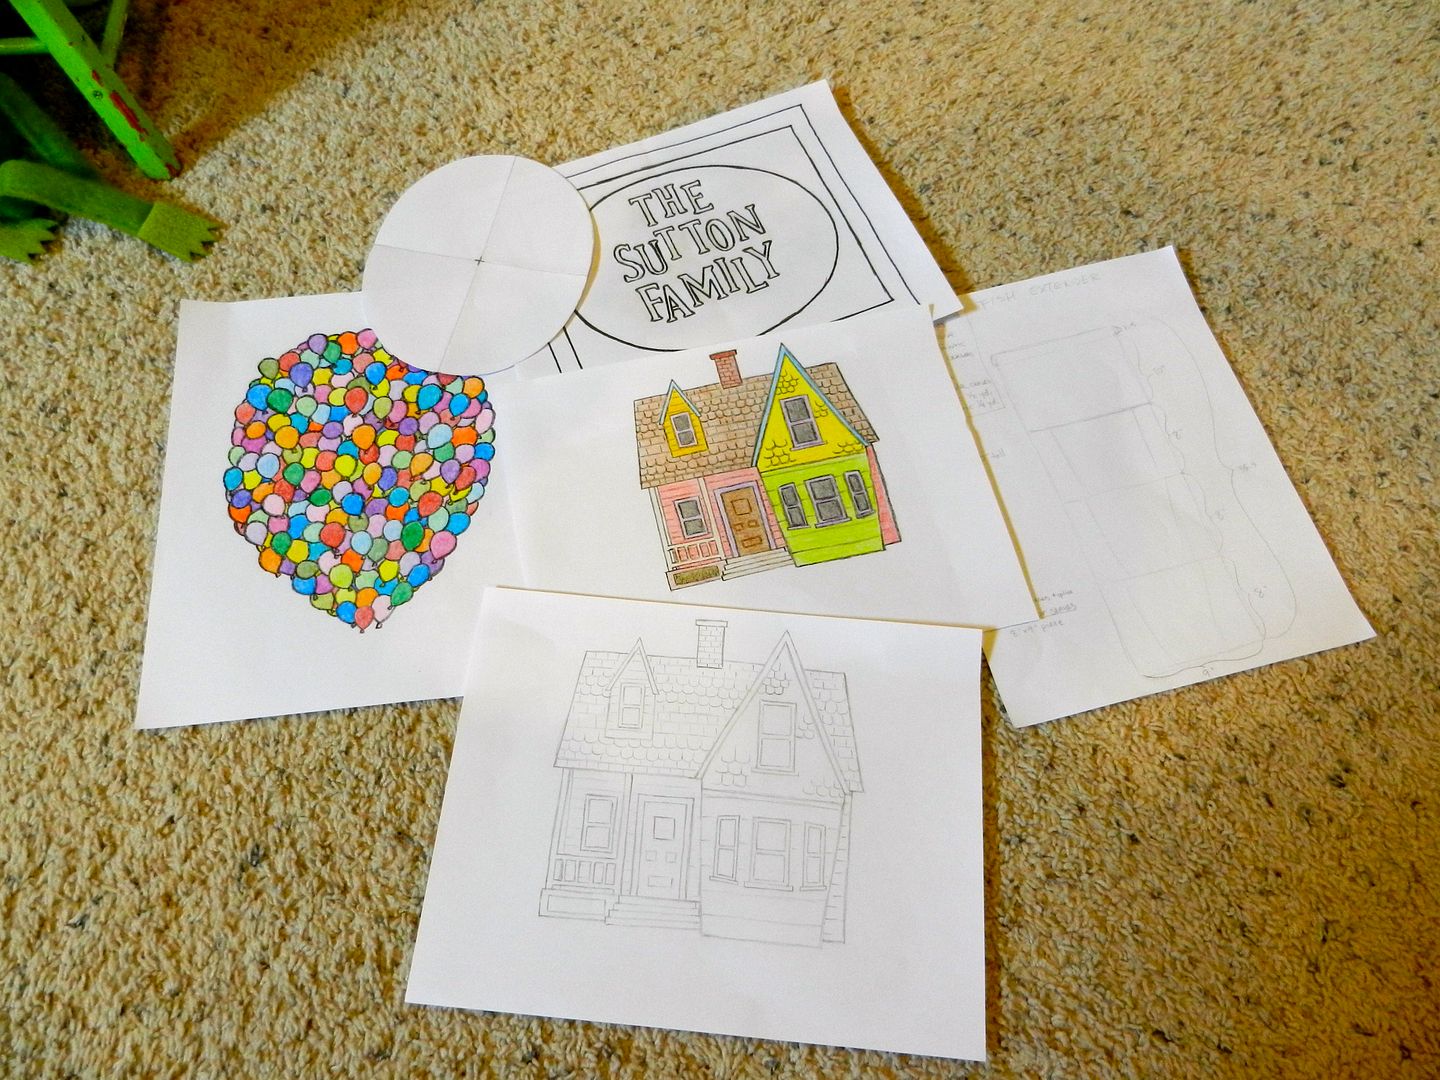
I'll leave you with a handful of my stack of sketches, colored pages, and templates.

file-6.jpg
 

Tiggerish

Resident Redhead
Premium Member
Holy frickin' Smokey.

That is amazing work. Thank you for sharing the whole process--it leaves me even more in awe of what you've done. I'm sitting here actually kind of teared up at the amount of thought, effort, talent and love that went into creating that piece of art. My mother would say, "God bless your hands"; it's a phrase used in Ireland when one encounters a beautifully handcrafted item, and it seems particularly appropriate here.

(Thankfully, it is a bad allergy day today and anyone passing my door and seeing my glistening eyeballs will chalk it up to pollen. :lol:)

I have my own set of crayons, too. :D Wish I could put them to such brilliant use as you do yours.
 

Register on WDWMAGIC. This sidebar will go away, and you'll see fewer ads.

Back
Top Bottom