I posted this earlier on the other thread, but I updated it a bit, because I do want to share this with you all.
How I Draw Blueprints
You only need a few things:
- Computer paper
- Sharpened pencil or Sharpie
- Ruler
- Phone or Camera with editing tools.
*Step 1 - Find something to take inspiration from
Let's say you are doing a Tree of Life Project...like we did in SA Season 3 Challenge 6...and you want to have a general idea of the Tree's layout, interior, exterior, etc.
All you need to do is a google image search for "Tree of Life Disney Blueprint" and presto...
Is it clear or a lot to go off of? No...but it's a start
. All you need is a foundation.
*The reason why this step has an asterisk is because it depends on the prompt. If the prompt allows you to design a new place...well then you just skip to step two! Or you can look up some places to take inspiration from, and just use creative flexibility!
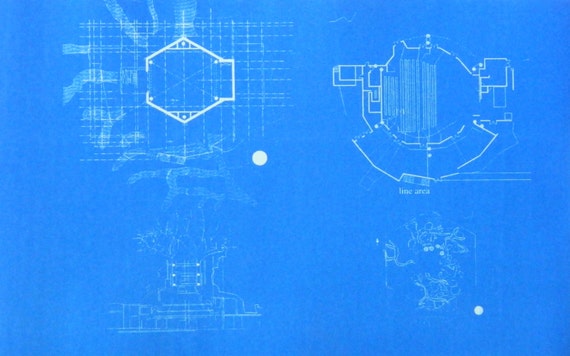
Step 2 - Draw out your design
The final image below is taken from The Sorcerer's Apprentice Season 3 - Challenge 6. Probably my personal favorite concept of the year - I worked on this with Team Goofy and we designed a Tree of Life attraction called "Symbiosis"
Step 3 - Take a picture
For this I have a Samsung S6 Phone that I snapped an image of it with.
Step 4 - Edit
On a phone, once you take the picture there should be an edit option. Click on that. For me - I have 5 options: Auto-adjust, rotate, crop, photo editor, collage. Before you click on "photo editor" - make sure you've rotated and cropped the photo to your liking.
Step 5 - Photo Editor
Once you've clicked on photo editor - there should be a few more options. Click on "Effect" (you'll come to an Instagram type page) with an option for "Negative" Click on that one and "apply"
If it takes you back to the image...click "edit" again but this time go to "Tone" - in tone you'll see options for saturation. If you move the saturation tab to the right, you'll see the image glow more blue...just fiddle around with the saturation until you get the image to your liking and hit apply.
- Note: If the image is too dark, you can go back to the "Effect" option and click on "Blue Wash" - this will make it more "blueprinty"

Hit save...then I usually just upload my pictures to Photobucket and copy/paste them over to the thread...but if you have an option that works for you..go for it!
And tada! Your very own armchair-Imagineering blueprint!
Link to the Project:
http://forums.wdwmagic.com/threads/the-sorcerers-apprentice-season-3.901352/page-18
Hopefully this was helpful...if you have any questions feel free to ask! And also this is just my way of doing it...not the only way...so if you're interested or find you have a different way of doing it - awesome! You go Glen Coco