-
I guess i am a 'old school' WED-head...as i use paper, pencil, ink, and paint with my hands to create artwork, models, and animated figures.
No computer programs.
No digital stuff.
Just the 'traditional' way.
A example some here may enjoy -
This is a hand drawn, hand painted t-shirt depicting Tony Baxter's famous concept art for 'Discovery Bay'.
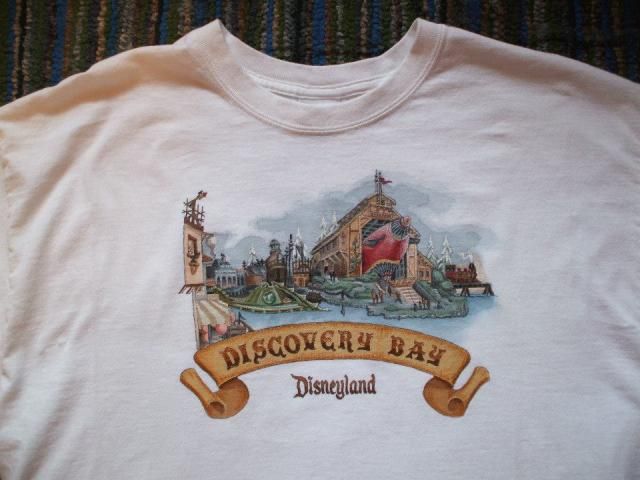
How was it done with the above tools..?
A photo to help explain the creative process for this particular project -

Top right -
A small copy of the original watercolor painting done by Tony Baxter is used as a reference for the line drawing version, and the eventual painting process to come.
Top left -
A black and white line drawing is made by hand that captures most of the elements from the original painting.
A title 'banner' and Disneyland Logo is added to the drawing to create the finished intended shirt design.
The black and white line drawing is then used as a guide to hand trace this same image onto the fabric of a t-shirt in permanent ink marker.
This is accomplished by using a home made 'light box' which shines a bright light from behind a clear surface, to which the line drawing is taped.
The shirt fabric is stretched over it and tracing can begin.
Bottom center -
Once the line drawing is traced onto the shirt, painting begins in earnest with special flexible fabric paints.
For this particular shirt, all 36+ colors were custom mixed by hand based on the hues from the original watercolor painting reference.
On either side of the finished shirt shown, are two of the many folded pieces of paper used as 'palettes' to mix the various needed colors.
Applied in layers, starting with a 'base color', different shades of mixed paint are applied and details are built up after many applications.
The end result is a permanent, non-fading, non-cracking/peeling graphic on the shirt.
Total time to make this particular shirt, from start to finish was about a week.

")


