
-
Welcome to the WDWMAGIC.COM Forums!
Please take a look around, and feel free to sign up and join the community.
You are using an out of date browser. It may not display this or other websites correctly.
You should upgrade or use an alternative browser.
You should upgrade or use an alternative browser.
Lightroom tips and tricks
- Thread starter wdwmagic
- Start date
Sweet Melissa
Well-Known Member
I feel similarly. I never had Lightroom before subscribing to Adobe CC. Prior to that, I had PSE at home and Photoshop CS6 at work, so I'm much more comfortable in that environment. I'm doing most of my fine-tuning in Photoshop and Camera Raw. Lightroom feels kind of foreign and not very user-friendly to me. I sometimes wonder what I'm missing by not turning to Lightroom, as so many people seem to prefer it.This sparks my interest. I'm primarily a Photoshop person and have a basic knowledge of Lightroom. I've thought about using it for my personal images as it seems faster to do some things in it than Photoshop.
fractal
Well-Known Member
Assuming you are shooting in RAW vs. Jpeg ( although some of this will work with a Jpeg with varying levels of success )
A few ways to make your skies "more blue" with more "pop''.
Lower your highlights (move slider to the left).
In the HSL color section, switch from "saturation" to "luminance". Then turn the blue slider to the left. I generally go -10 to -15.
You can also mess around with changing the tint in your highlights under "split toning" - using the adjustment brush to you can just change the sky.
Original file no adjustments (even has a sensor spot).

Processed shot. Highlights moved to -77 along with shadows being brought up to +75, and blue luminous down to -13.

A few ways to make your skies "more blue" with more "pop''.
Lower your highlights (move slider to the left).
In the HSL color section, switch from "saturation" to "luminance". Then turn the blue slider to the left. I generally go -10 to -15.
You can also mess around with changing the tint in your highlights under "split toning" - using the adjustment brush to you can just change the sky.
Original file no adjustments (even has a sensor spot).
Processed shot. Highlights moved to -77 along with shadows being brought up to +75, and blue luminous down to -13.
Last edited:
fractal
Well-Known Member
I also have tended to move up my Vibrance slider vs. my saturation slider. Especially when using good lenses. The vibrance will add rich bright color without it looking too saturated or fake. In the previous shot (DHS) my vibrance was +16 while my saturation was actually - 5.
@NowInc has posted some great tutorials here on how he utilizes Lightroom and I've picked up a few tricks from him. His style is different than mine but watching his videos gave me a better understanding of how LR sliders interact.
Speaking of different styles - after editing literally tens of thousands of files, I found myself doing many of the same adjustments. Over the last year or so I've developed about 12-15 presets that I use to start off a photo. Each was made under different lighting or subject scenarios. That has saved me much time and also starts to give you a "look" of your own.
fractal
Well-Known Member
Here is another example were I was able to save a well overexposed shot ( the price I sometimes pay for shooting in manual and not using the EVF).
Original file

First thing I did was drop the exposure by 1.4 meaning I was overexposed by 1 1/2 or so stops. Then I moved Highlights slider to left -77 and shadows to right +85. I had to amp up my whites +40 and drop my blacks -47.
Variance +11
Saturation 0
Blue variance -13
I also moved the temperature a bit to the left - more of a stylistic choose and I think Sony files tend to be on the "warm" side.
Final image...

I was able to bring out the blues in the sky and some nice detail in the clouds. Had I properly exposed the shot, the final image would have looked even better but by shooting in RAW I still ended up with a shot I like.
Original file
First thing I did was drop the exposure by 1.4 meaning I was overexposed by 1 1/2 or so stops. Then I moved Highlights slider to left -77 and shadows to right +85. I had to amp up my whites +40 and drop my blacks -47.
Variance +11
Saturation 0
Blue variance -13
I also moved the temperature a bit to the left - more of a stylistic choose and I think Sony files tend to be on the "warm" side.
Final image...
I was able to bring out the blues in the sky and some nice detail in the clouds. Had I properly exposed the shot, the final image would have looked even better but by shooting in RAW I still ended up with a shot I like.
Last edited:
NowInc
Well-Known Member
Lightroom is a lot more advanced than people realize. The best tips I can give people are to LEARN HOTKEYS!!! It is frustrating at first, but once you get a good set into your muscle memory, you will be processing at least twice as fast as you were before.
Here is a link to the official Adobe page listing the current set of Hotkeys.
Another good tip is to use your camera/lens profiles. Lightroom is updated frequently to add support and profiles for more gear and using the correct set for your rig makes editing easier (and more accurate). But what if your lens isn't on the profile list? Google it") You will 9 times out of 10 find a user made profile that will work. This also applies if your current profile isn't "great" (there are a bunch that are just not quite right built in). A better one is only a short search away (usually).
You will 9 times out of 10 find a user made profile that will work. This also applies if your current profile isn't "great" (there are a bunch that are just not quite right built in). A better one is only a short search away (usually).
Sharpen LAST. Providing you aren't exporting to another suite to do further editing, the last step you should do in Lightroom is some form of sharpening. The tools inside Lightroom are OK, but there are several 3rd party ones that are way better...just not free.
Virtual Copies are GREAT. Not sure what direction you want to take with your edit? Make a virtual copy of it and do several different versions. It takes up no space and this way you can evaluate what looks best on a broader spectrum.
Do basic processing of your files on IMPORT. You can set up macros to do things like adding tags as they are imported, or apply lens corrections etc. Will take a bit longer but its usually a process you start and walk away anyway...and will end up saving you time in the long run.
I could go on forever...and will add more I am sure..but thats some good ones to get you started.
Regarding my tutorials: I have actually been working on a full training series on Photography/Lightroom/Photoshop that will be pretty long once released. Covering everything from Shooting to import to finalizing. I am taking my time on it, doing multiple takes (to fix my issue with talking too fast), but in the end it should be worth it I am looking forward to sharing it once its ready, hopefully by December.
Here is a link to the official Adobe page listing the current set of Hotkeys.
Another good tip is to use your camera/lens profiles. Lightroom is updated frequently to add support and profiles for more gear and using the correct set for your rig makes editing easier (and more accurate). But what if your lens isn't on the profile list? Google it
You will 9 times out of 10 find a user made profile that will work. This also applies if your current profile isn't "great" (there are a bunch that are just not quite right built in). A better one is only a short search away (usually).Sharpen LAST. Providing you aren't exporting to another suite to do further editing, the last step you should do in Lightroom is some form of sharpening. The tools inside Lightroom are OK, but there are several 3rd party ones that are way better...just not free.
Virtual Copies are GREAT. Not sure what direction you want to take with your edit? Make a virtual copy of it and do several different versions. It takes up no space and this way you can evaluate what looks best on a broader spectrum.
Do basic processing of your files on IMPORT. You can set up macros to do things like adding tags as they are imported, or apply lens corrections etc. Will take a bit longer but its usually a process you start and walk away anyway...and will end up saving you time in the long run.
I could go on forever...and will add more I am sure..but thats some good ones to get you started.
Regarding my tutorials: I have actually been working on a full training series on Photography/Lightroom/Photoshop that will be pretty long once released. Covering everything from Shooting to import to finalizing. I am taking my time on it, doing multiple takes (to fix my issue with talking too fast), but in the end it should be worth it
I am looking forward to sharing it once its ready, hopefully by December.fractal
Well-Known Member
The new Dehaze slider can be used to get rid of some of that pesky fireworks smoke
Might be about time for me to upgrade.
NowInc
Well-Known Member
Might be about time for me to upgrade.
The tool is also good for clearing up night sky pictures. Its not a miracle slider by any means, but a good quick fix
Allen C
Well-Known Member
The new Dehaze slider can be used to get rid of some of that pesky fireworks smoke
Agreed 110%.
This was unusable before DeHaze. It was an evening where the smoke just hung on and just didn't want to dissipate. DeHaze does add a little bit of contrast but it's easily dealt with.

htx
Well-Known Member
NowInc has some great tutorials already out there and how he does his workflow. I love watching how others use lightroom and other tools to edit their photos. It is really interesting how we all edit things differently. I think one underutilized tool in lightroom is the graduated filter. As you know it is really easy to blow out your sky to expose your subject properly, especially during harsh or bright lighting. You can use the tool do turn the exposure in your graduated filter and change the color to make that part of the image colder or warmer. I started a tutorial on it and will finish it up one of these days and post it.
In this photo the sky was blown out and the graduated filter fixed it for me. I will look for the before and post that later.
 Jen-3238 by Louis Sabatini, on Flickr
In this photo the sky was blown out and the graduated filter fixed it for me. I will look for the before and post that later.
Jen-3238 by Louis Sabatini, on FlickrJahona
Well-Known Member
The tools inside Lightroom are OK, but there are several 3rd party ones that are way better...just not free.
I would love to see a list of 3rd party plugins that you like.
Chadder810
Well-Known Member
Love all the tips people are throwing out here. If anyone has one for getting your White balance correct, I'm all ears. I love using Lightroom, but that's one area where i struggle for some reason.
Gig 'Em Mickey
Well-Known Member
I'm a total noob, but I'm getting much better at lightroom. Nowinc's videos are great. So are Serge Ramelli's. For me the color and saturation, highlights and shadows were all easy to figure it out. What helped me the most is learning things like graduated filters, brush, and the dehaze tool.
Here's a before:
 San Francisco 2015-0309 by Kyle Metcalf, on Flickr
Here's after. Dehaze helped a lot in this one. Color, sharpening/masking, and noise reduction applied in lightoom:
 DSC_0309 by Kyle Metcalf, on Flickr
Here's a great example of the dehaze tool in action. It really took this image from meh, to pretty good I think:
Before:
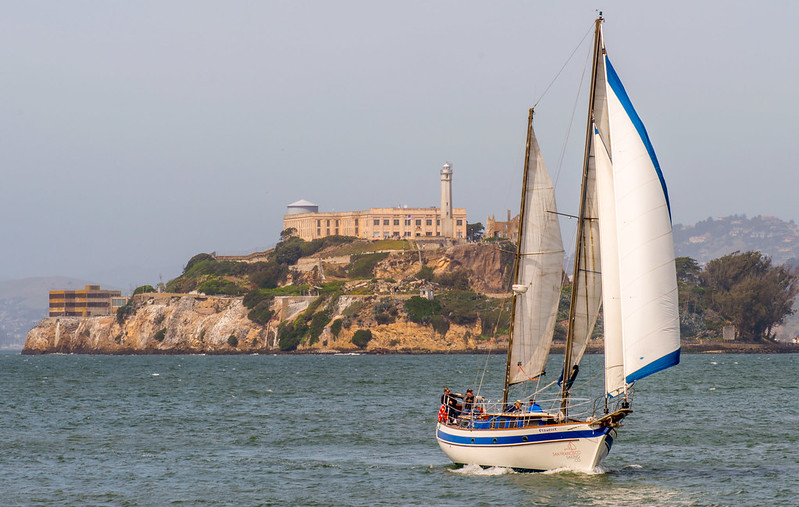 San Francisco 2015-0068 by Kyle Metcalf, on Flickr
After. Primarily dehaze, WB correction, sharpen/mask.
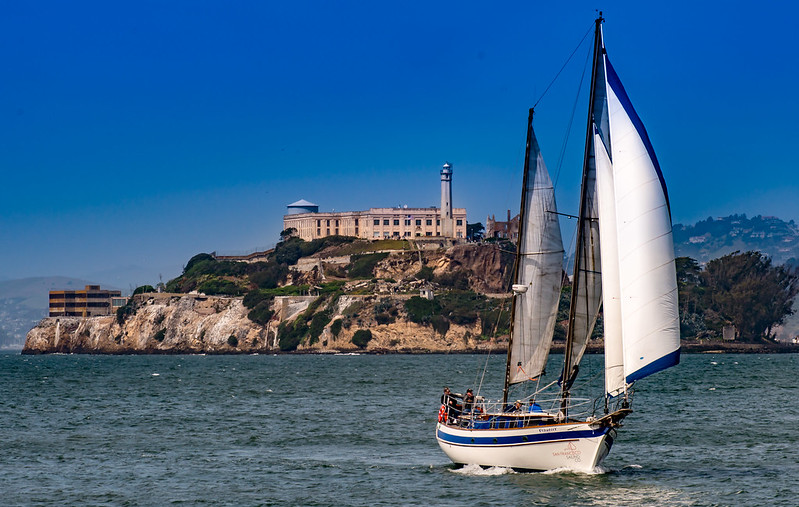 DSC_0068 by Kyle Metcalf, on Flickr
Here's a before:
San Francisco 2015-0309 by Kyle Metcalf, on FlickrHere's after. Dehaze helped a lot in this one. Color, sharpening/masking, and noise reduction applied in lightoom:
DSC_0309 by Kyle Metcalf, on FlickrHere's a great example of the dehaze tool in action. It really took this image from meh, to pretty good I think:
Before:
San Francisco 2015-0068 by Kyle Metcalf, on FlickrAfter. Primarily dehaze, WB correction, sharpen/mask.
DSC_0068 by Kyle Metcalf, on FlickrNowInc
Well-Known Member
Love all the tips people are throwing out here. If anyone has one for getting your White balance correct, I'm all ears. I love using Lightroom, but that's one area where i struggle for some reason.
You can use that eyedropper next to the color balance sliders (develop tab all the way on top on the right) to select a neutral gray. That should help
Just finding the neutral gray is the difficult part LOLYou can use that eyedropper next to the color balance sliders (develop tab all the way on top on the right) to select a neutral gray. That should help
Register on WDWMAGIC. This sidebar will go away, and you'll see fewer ads.